
How Locked and Hidden Apps Secure Your Privacy in iOS 18

Toggle Dark Mode
One of the biggest privacy gaps in Apple products over the years is that the company has never really embraced the idea that more than one person might use an iPhone or iPad. From the beginning, Apple’s philosophy seemed to be that locking the front door of your device was enough, but nearly everything was fair game once you were inside.
In later years, Apple allowed users to lock things down in a few sensitive areas, such as encrypting specific items in the Notes app and, more recently, requiring Face ID for its new Journal app. However, it was up to third-party developers to install their own locks if they wanted to help users protect their privacy.

That single-user mentality also extended to the iPad in some more unfortunate ways. Apple added support for multiple user profiles way back in iOS 9, but those were limited to educational institutions. Despite a few hints over the years? that Apple was considering expanding this feature to everyday users, it has yet to come to fruition.
Sadly, iPadOS 18 won’t change that — the iPad remains a single-user tablet as far as Apple is concerned — but the company has made a significant change for both the iPhone and iPad in iOS/iPadOS 18 for those who occasionally share their devices with others.
With iOS 18 and iPadOS 18, you’ll be able to lock any app installed on your device, requiring authentication with Face ID, Touch ID, or a passcode before it can be opened. This is a system-level lock that operates independently of anything that third-party developers put into their apps; in fact, if you lock an app in iOS 18 that already has its own security, you’ll need to authenticate twice — once for the system and once for the app.
For those who want even more privacy, Apple has taken this a step further, letting you hide apps entirely. This removes virtually all traces of an app’s existence from your iPhone or iPad. Hidden apps will be spirited away to a “Hidden” folder in your App Library, the contents of which are entirely obscured until you tap on it and authenticate with biometrics or your passcode.
As things stand in the first iOS 18 developer beta, the Hidden folder is there whether you’ve hidden any apps or not. I suspect this is a feature and not a bug; if the folder only appeared after you’ve hidden your first app, then anybody seeing it would know you’re hiding something. Putting it on everyone’s iPhone (and iPad) gives nothing away.
Locking or hiding an app in iOS 18 is also much more thorough than the security features built into most third-party apps or workarounds in Shortcuts. It affects not only the ability to open or see the app itself but also notifications, Spotlight searches, and widgets. A locked app will show privacy notifications without previews; a hidden app won’t show any notifications at all; in either case, you won’t be able to search for data inside a locked or hidden app without opening it. In the current iOS 18 beta, widgets for an app will be removed when you lock or hide it.
Most apps can be locked, although there are a few exceptions among Apple’s built-in apps, including Settings, Camera, Maps, Find My, Contacts, and Clock. Some of these are odd omissions — you can lock the Phone app but not the Contacts app — so some could change by the final iOS 18 release. However, it’s understandable why Apple might not want to allow users to lock some of these, such as the Settings app. Most of Apple’s first-party apps also can’t be hidden right now.
How to Lock or Hide an App in iOS 18
Here’s how locking and hiding apps works in the first developer beta:
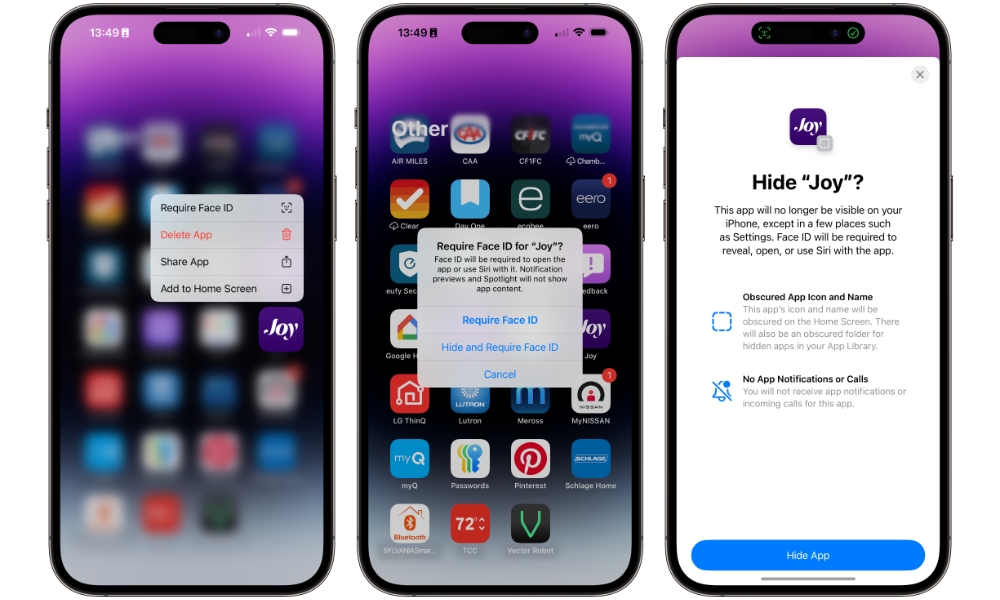
- Locate the app you want to lock or hide and long-press on the app icon to bring up a context menu.
- Select Require Face ID (or Require Touch ID if you’re using an iPhone SE or an iPad with Touch ID).
- In the confirmation pop-up that appears, select Require Face ID again to lock the app or Hide and Require Face ID to hide it.
- If you’ve elected to hide the app, you’ll get an additional confirmation screen explaining the process. Select Hide App to confirm.
A locked app will remain where it was, although any widgets for it will vanish from your home screens. If you later decide to unlock the app, you’ll have to re-add those manually.
A hidden app will vanish from the Home Screen and App Library. To locate it, scroll to the bottom of your App Library, tap on the Hidden folder, and authenticate with Face ID, Touch ID, or your passcode. Apps in the hidden folder are still locked with Face ID, but this requirement may be skipped if you open them as soon as you unlock the hidden folder, as your previous Face ID authentication remains valid for a very brief period of a second or two.
To unlock or unhide an app, find the app icon, long press on it again, and select Don’t Require Face ID from the context menu.
Can I Use My Passcode to Open Locked Apps?
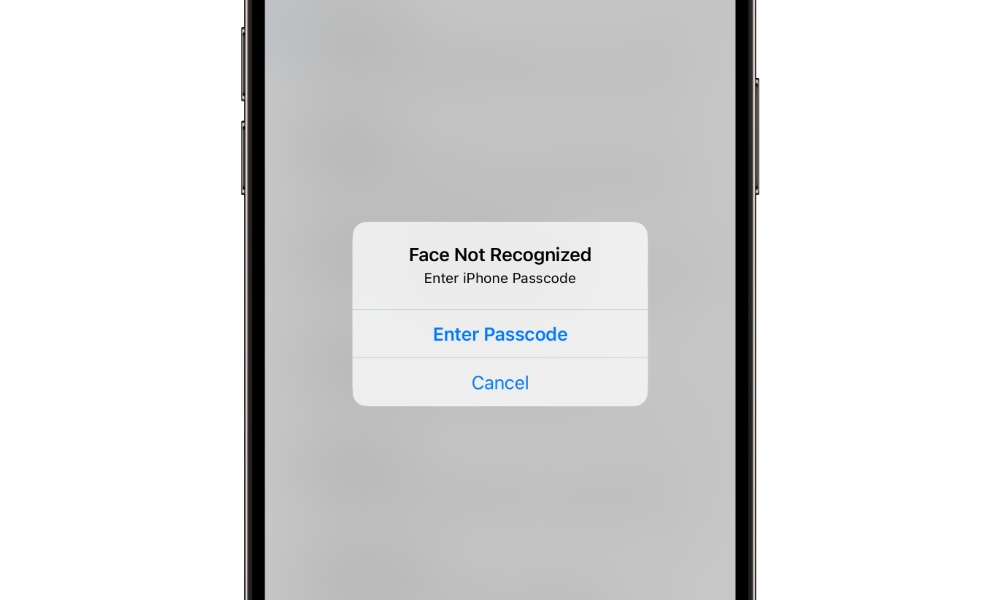
Although the feature emphasizes the use of Face ID (or Touch ID), it’s still possible that your passcode can be used to access locked apps or your hidden folder.
That’s because, in most cases, the passcode acts as a fallback when biometric authentication fails. This is true on the Lock Screen and when paying via Apple Pay, and it’s equally true for locked and hidden apps.
However, there’s some good news if you want to protect your sensitive apps from folks who might know your passcode, at least on your iPhone. That’s thanks to Apple’s relatively new Stolen Device Protection feature, which was introduced earlier this year in iOS 17.3.
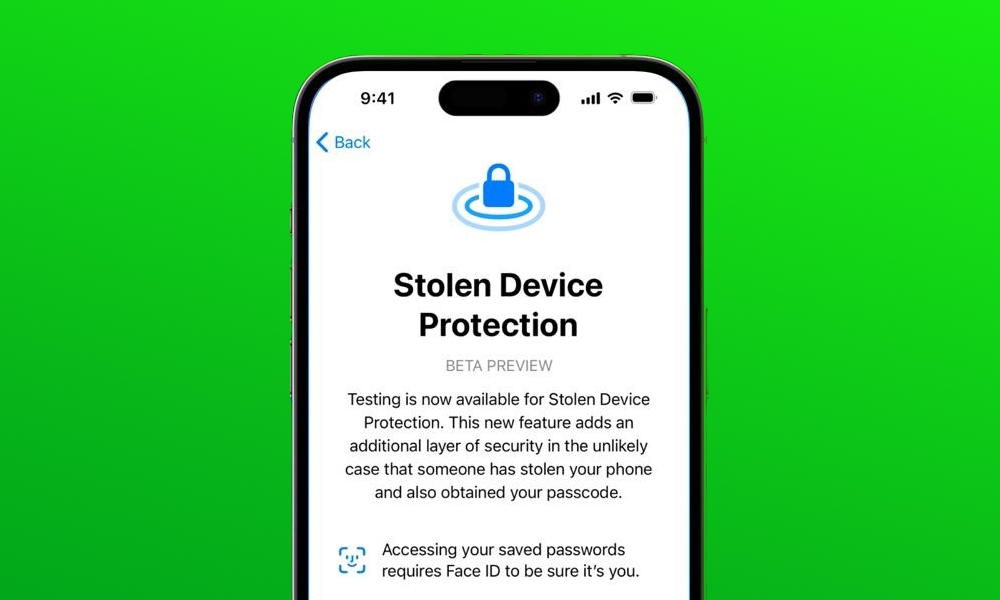
When Stolen Device Protection is turned on, Face ID (or Touch ID) becomes the only option for accessing sensitive settings and apps — with no fallback to a passcode. This includes the new iOS 18 features to lock and hide apps.
How well this works will depend on how you’ve configured Stolen Device Protection. By default, passcode fallback is available whenever you’re at a familiar location, such as your home, workplace, or school. However, you can change this behavior to always require biometric authentication no matter where you are — and you can already do this to protect other areas of your iPhone in iOS 17.4 or later. Here’s how:
- Open the Settings app on your iPhone.
- Scroll down and select Face ID & Passcode (or Touch ID and Passcode on an iPhone SE).
- Enter your passcode.
- Scroll down and select Stolen Device Protection.
- On the next screen, make sure the switch beside “Stolen Device Protection” is on, and select Always under “Require Security Delay.”
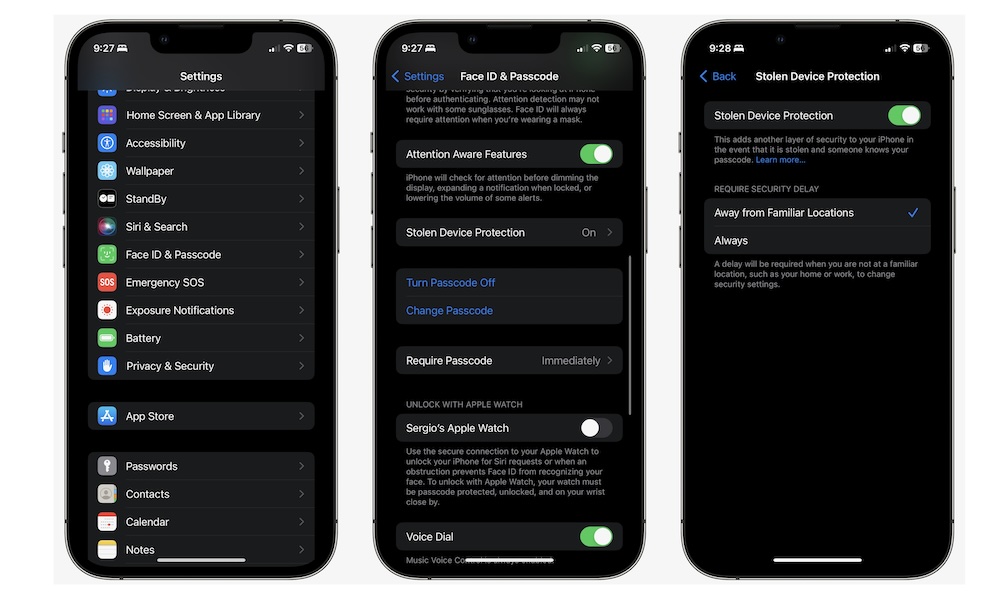
This text on this screen is a bit misleading, as it suggests that this setting only affects the Security Delay feature — the requirement to wait an hour before changing any critical security settings, such as your passcode or Find My status.
This also includes changing Stolen Device Protection settings, so be aware that if you switch to “Always,” you’ll need to wait an hour before you can change back to “Away from Familiar Locations.”
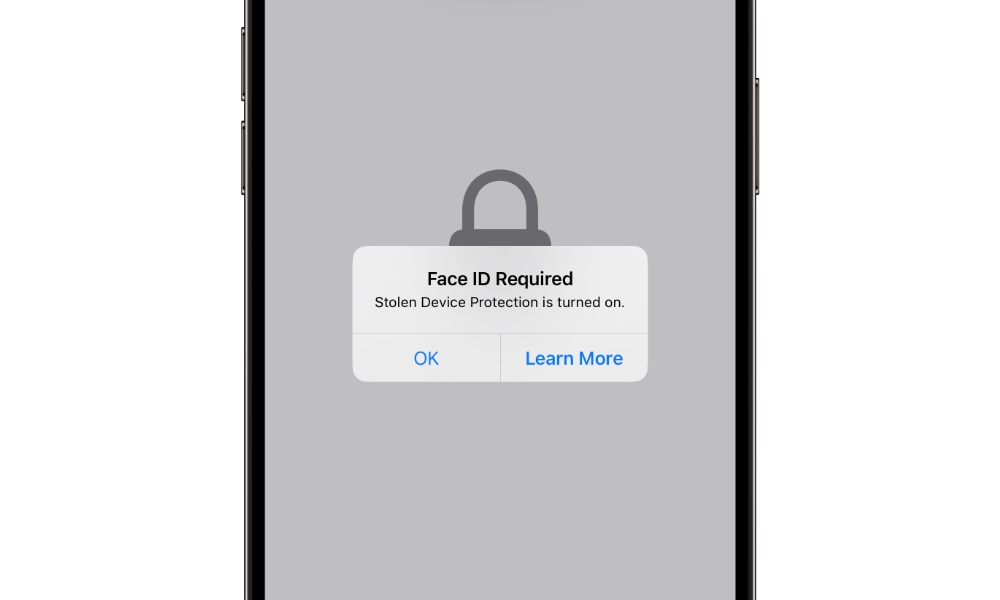
However, as Apple explains in its support document, it’s also used to enforce Face ID or Touch ID biometric authentication with no password fallback.
When your iPhone is in a familiar location, these additional steps are not required, and you can use your device passcode like usual. Familiar locations typically include your home, work, and certain other locations where you regularly use your iPhone. If you choose, you can set up Stolen Device Protection to always require these additional security measures, even when your iPhone is in a familiar location.Apple
When Stolen Device Protection is in effect — either because you’re away from a familiar location or you’ve set it to “Always” — then instead of being asked for a passcode when Face ID or Touch ID fails, you’ll see a “Face ID Required” message explaining that Stolen Device protection is turned on.
While setting Stolen Device Protection to “Always” can be inconvenient when you want to change other security settings, it’s the best way to ensure that your passcode can never be used to access anything important on your iPhone, including locked and hidden apps in iOS 18. However, you’ll want to be more careful with your iPad passcode, as Stolen Device Protection isn’t available in iPadOS — at least not yet.


