
8 Tips and Tricks to Master Safari on Your iPhone
By far, Safari is the best web browser for your iPhone. As you can expect from an Apple product, it works perfectly with the Apple ecosystem — especially on your iPhone — but there's more to Safari than meets the eye.
Apple has spent a lot of time improving Safari and adding new features with every software update. In fact, Safari has so many features that it's likely you haven't tried them all.
Whether you're a new iPhone user or you've used Safari your whole life, there's always something new to learn. And we're here to help you out. Read on for 8 of the best tips and tricks you need to learn to master Safari on your iPhone.
Add a Safari Tab Group into a Focus Mode
You've probably heard of Safari Groups before. It's a way to keep your tabs organized so you don't mix your work tabs with your personal ones.
Apple improved this feature with iOS 17. Now, you can add a specific Tab Group to a Focus mode, forcing yourself to be productive when it's time to work or to stay off of work when you're at home.
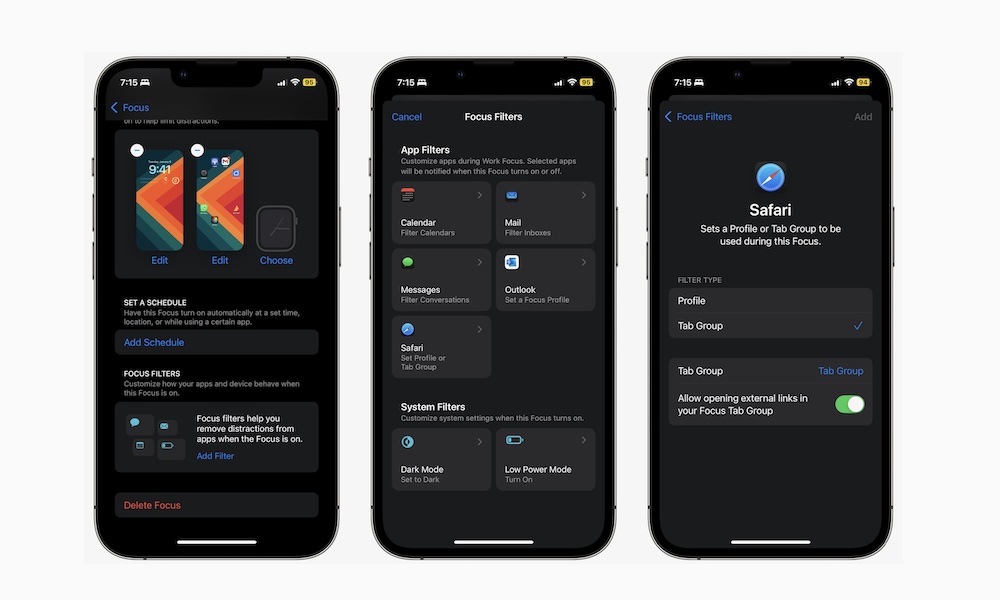
Here's how to add a Safari Tab Group to a specific Focus mode:
- Open the Settings app.
- Scroll down and go to Focus.
- Choose the Focus mode you want.
- Scroll down to the bottom and tap on Add Filter.
- Choose Safari.
- Tap on Tab Group.
- Tap on Tab Group near the bottom of your screen.
- Choose the Tab Group you want or select New Group.
- Tap on Add in the top right corner of your screen.
And that's it. You've just created your filter. You can add another one if you like, or tap the filter you just created and select Delete Filter to get rid of it.
Read Without Distractions
Nowadays, websites are packed with different sections, so you can find something new you may like. Of course, that's not necessarily bad; it's a way for you to find new articles you might be interested in.
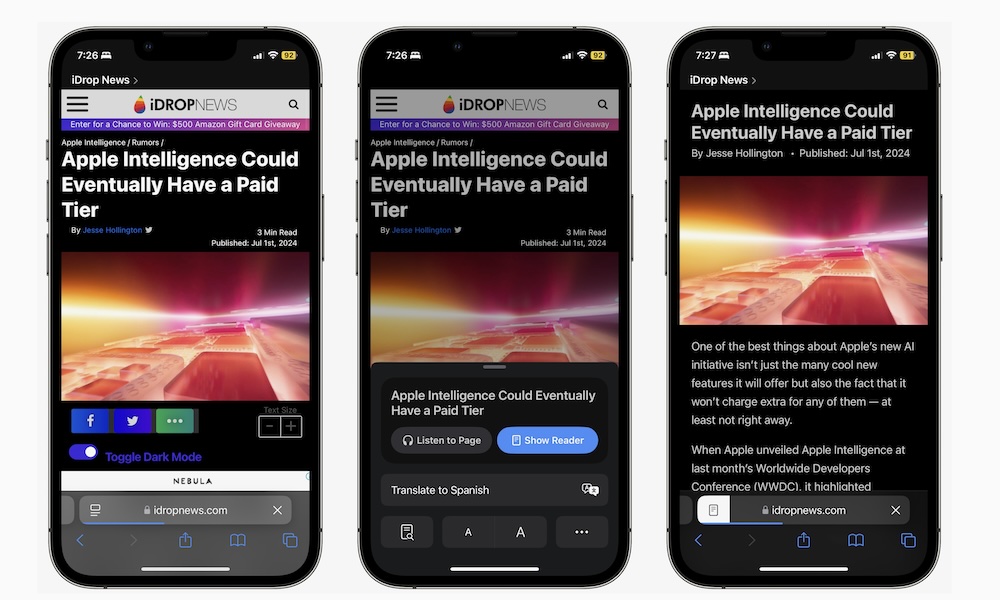
However, that can be very distracting if all you want to do is read your article in peace. Luckily, Safari has a feature called Reader that can help you with that. With this feature turned on, you'll only see the text of the article, and all the extra stuff on the website will disappear, making it easier to read.
Not only that, but you can even change the settings, like the color of the background, type of font, or size, which is more comfortable for you to read. Here's how to use it.
- Open Safari.
- Go to the article you want to read.
- Tap the Page Settings button, which is located on the left side of the address bar (it should look like an aA icon).
- Tap on Show Reader.
And that's it. You can start reading your article without any distractions. To exit the Reader, simply follow the steps above and select Hide Reader.
Master Quick Website Search
Quick Website Search is a feature that makes searching for something on your favorite websites much easier, especially if you use that website's search bar often.
So, for instance, let's say you go to iDrop News and search for "best iPhone tips" using the platform's search feature. If Quick Website Search is turned on, your iPhone will store iDrop News as part of your website shortcuts.
That way, in the future, if you want to search for "best iPad tips" on iDrop News, you won't need to go to the website and tap the search button.
Instead, you can write "iDrop News best iPad tips" or even "iDrop best iPad tips" in Safari's address bar, and you'll see the option to Search idropnews.com for "best iPad tips" at the top of the search options.
If you select that option, Safari will automatically take you to iDrop News' search results, making it faster to search for something on your frequently used websites.
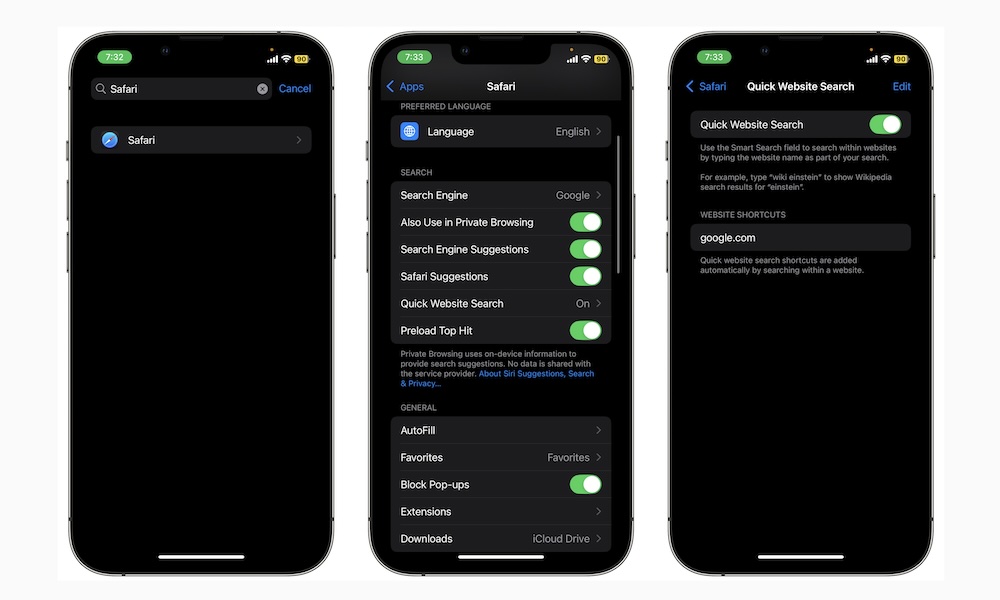
Quick Website Search should be turned on by default, but in case it isn't, here's how to do so:
- Open the Settings app.
- Scroll down and go to Safari.
- Scroll down, and under Search, tap on Quick Website Search.
- Enable Quick Website Search.
By default, you'll probably only see Google or your favorite search engine under your Website Shortcuts. Unfortunately, you can't manually add websites in the Safari settings.
Instead, you'll need to go to the website you want to add and use its search bar to search for something. Then, your iPhone will automatically add it to your shortcuts.
You can also tap on Edit at the top right corner of your screen to delete as many shortcuts as you want.
Translate the Text in Images
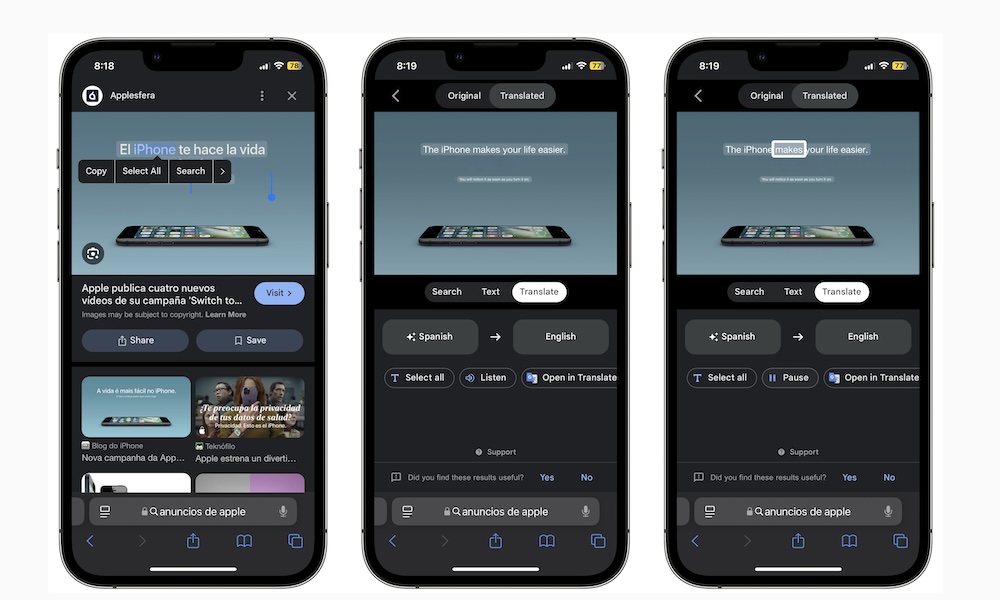
Another powerful feature in Safari is the ability to "read" the text in images. With this feature, you can copy the text of any image you find online and paste it anywhere you want.
If the image is clear enough, the results will be completely accurate. But that's not all it does; if you find an image with some text in another language, you can translate it in an instant without having to copy the text and paste it into a translator app. Here's how:
- Open Safari.
- Search for the image you want.
- Tap the text on the image until you see a small menu pop up.
- Tap on Select All if you need to.
- In the pop-up menu, tap the right-pointing arrow and then tap on Translate.
And that's when the magic happens. Instead of just showing you what the text says, Safari will translate the text into an image. You can then choose the language you want to translate it to and even tap on Listen to hear what the other language sounds like.
Additionally, you can grab the text and use it to search for something else if you want — all from this simple but powerful feature.
Synchronize All of Your Safari Extensions
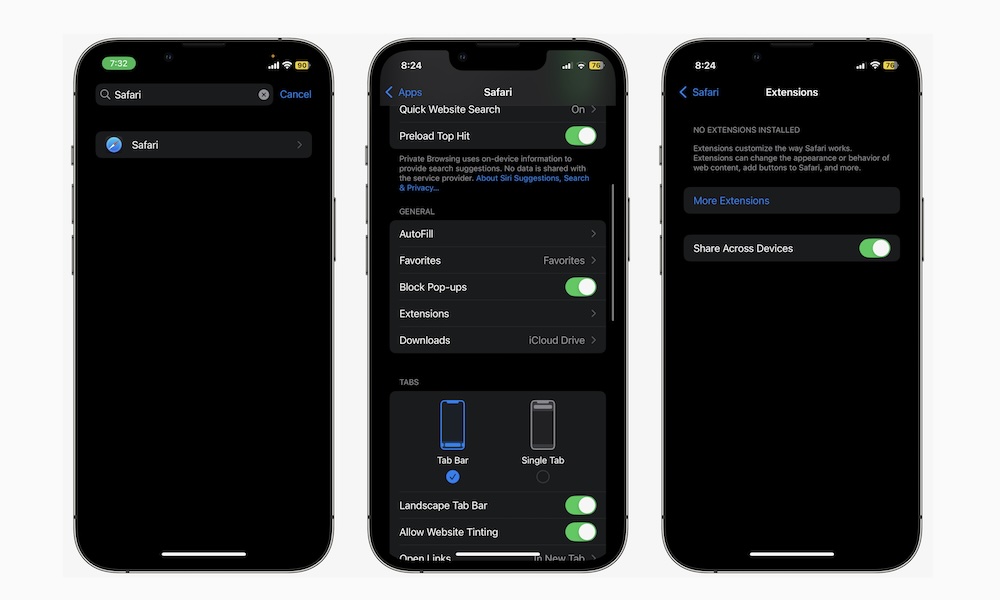
A couple of years ago, Apple made it possible to add Safari extensions to iPhones and iPads, bringing the long Mac-exclusive feature to its mobile devices.
While that's already great news, you can take it one step further and sync all your Safari extensions across all your Apple devices. That way, you only need to add an extension to your iPad, and your iPhone will automatically download it as well.
Of course, you need to allow your iPhone to sync your extensions across your Apple devices, and this is how:
- Open the Settings app.
- Scroll down and go to Safari.
- Scroll down, and under General, tap on Extensions.
- Turn on Share Across Devices.
Convert a Website to a PDF File

There may be times when you want to save an article you're interested in for whenever you have the chance to read it. You might also want to share it with someone or save it on your computer.
Whatever the reason, your iPhone lets you save any website as a PDF file, making it easier to find it in your Files app than on the web. Here's how to do it.
- Open Safari.
- Search for the web page you want to turn into a PDF file.
- Tap the Share button at the bottom of your screen.
- Scroll down and tap on Print.
- Pinch to zoom in on the preview at the bottom of your screen.
- With the preview open, tap on the Share button in the bottom left corner of your screen.
- Tap on Save to Files
- Choose the name and location where you want to save your PDF file. When you're done, tap on Save in the top right corner of your screen.
And that's it! Now, your website-turned-PDF file is safely stored in your iPhone. You can open the Files app and search for it in the folder where you saved it.
Use Safari's Quick Actions
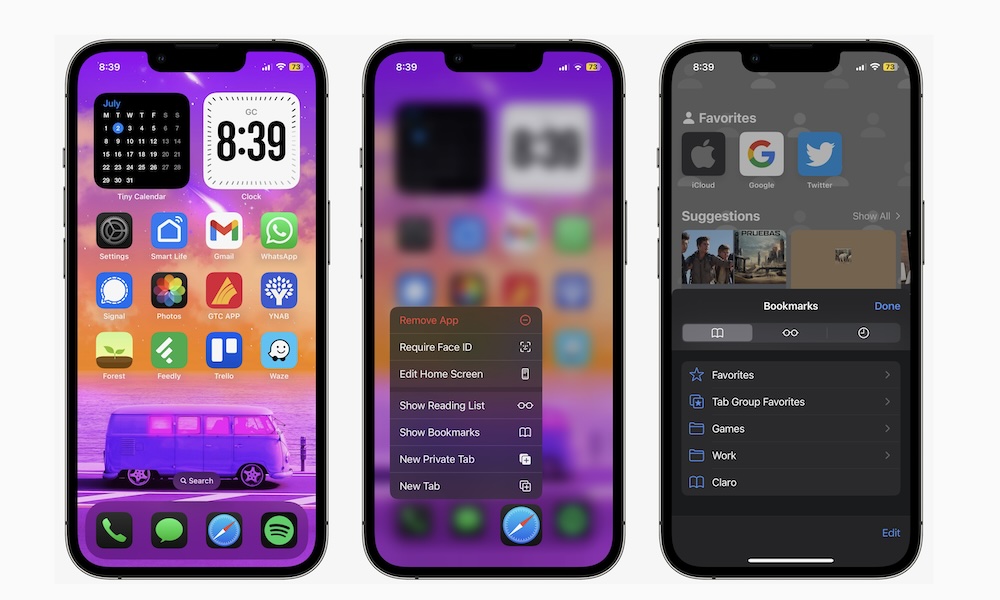
Like any app on your iPhone, Safari comes with a handful of Quick Actions you may not know about.
These Quick Actions make using the Safari app faster. For instance, you can use them to open a new tab, visit your Reading List, or access your Bookmarks.
To use Quick Actions, simply press and hold the Safari app icon in your Home Screen, Dock, or App Library. After you get a haptic response, you'll see a menu with a bunch of options for you to use.
Tap the option you want, and Safari will take care of the rest. It's that easy.
Bypass CAPTCHAs Automatically
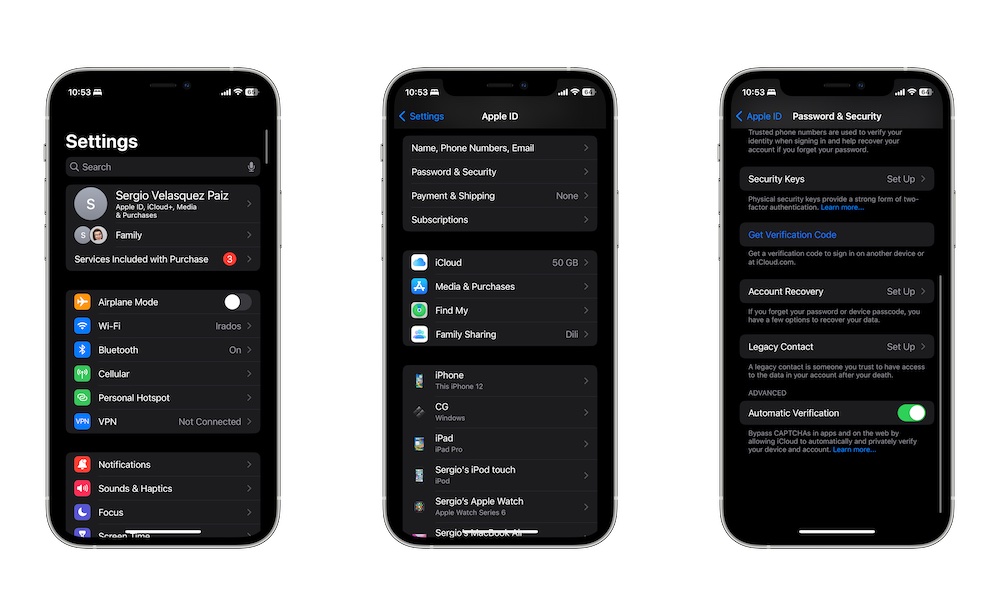
Captchas can be annoying, especially when they don't work like they should. Fortunately, your iPhone can vouch that you're a human and help you bypass Captchas on the web without you having to do anything.
This is thanks to a feature called Automatic Verification, which should be turned on by default in your iPhone. If not, here's how to enable it:
- Open the Settings app.
- Go to your Apple ID at the top of the page.
- Tap on Sign-In & Security.
- Scroll down to the bottom, and under Advanced, turn on Automatic Verification.
Note that this won't work with every website as the site has to be up to date to support Automatic Verification.