15 iOS 18 Settings You Need to Change ASAP
 Credit: Semeon Hrozian
Now that iOS 18 is finally here, we've all tried some of its biggest features. From the new design of the Photos app to an improved Notes app and a completely new and more powerful Calculator app, there are a lot of new things to play with.
However, these are just the tip of the iceberg. iOS 18 also comes with a bunch of small changes that you probably haven't even tried. To be precise, there are many settings that were either changed or added after you installed iOS 18 on your iPhone.
Some of them are great, while others you should change ASAP for your own privacy. Read on for 15 iOS 18 settings you should change as soon as possible.
Change Your Charge Limit
At this point, we all know that your iPhone's battery will age over time. Unfortunately, this happens to all batteries because of the charging cycles they undergo during their life span.
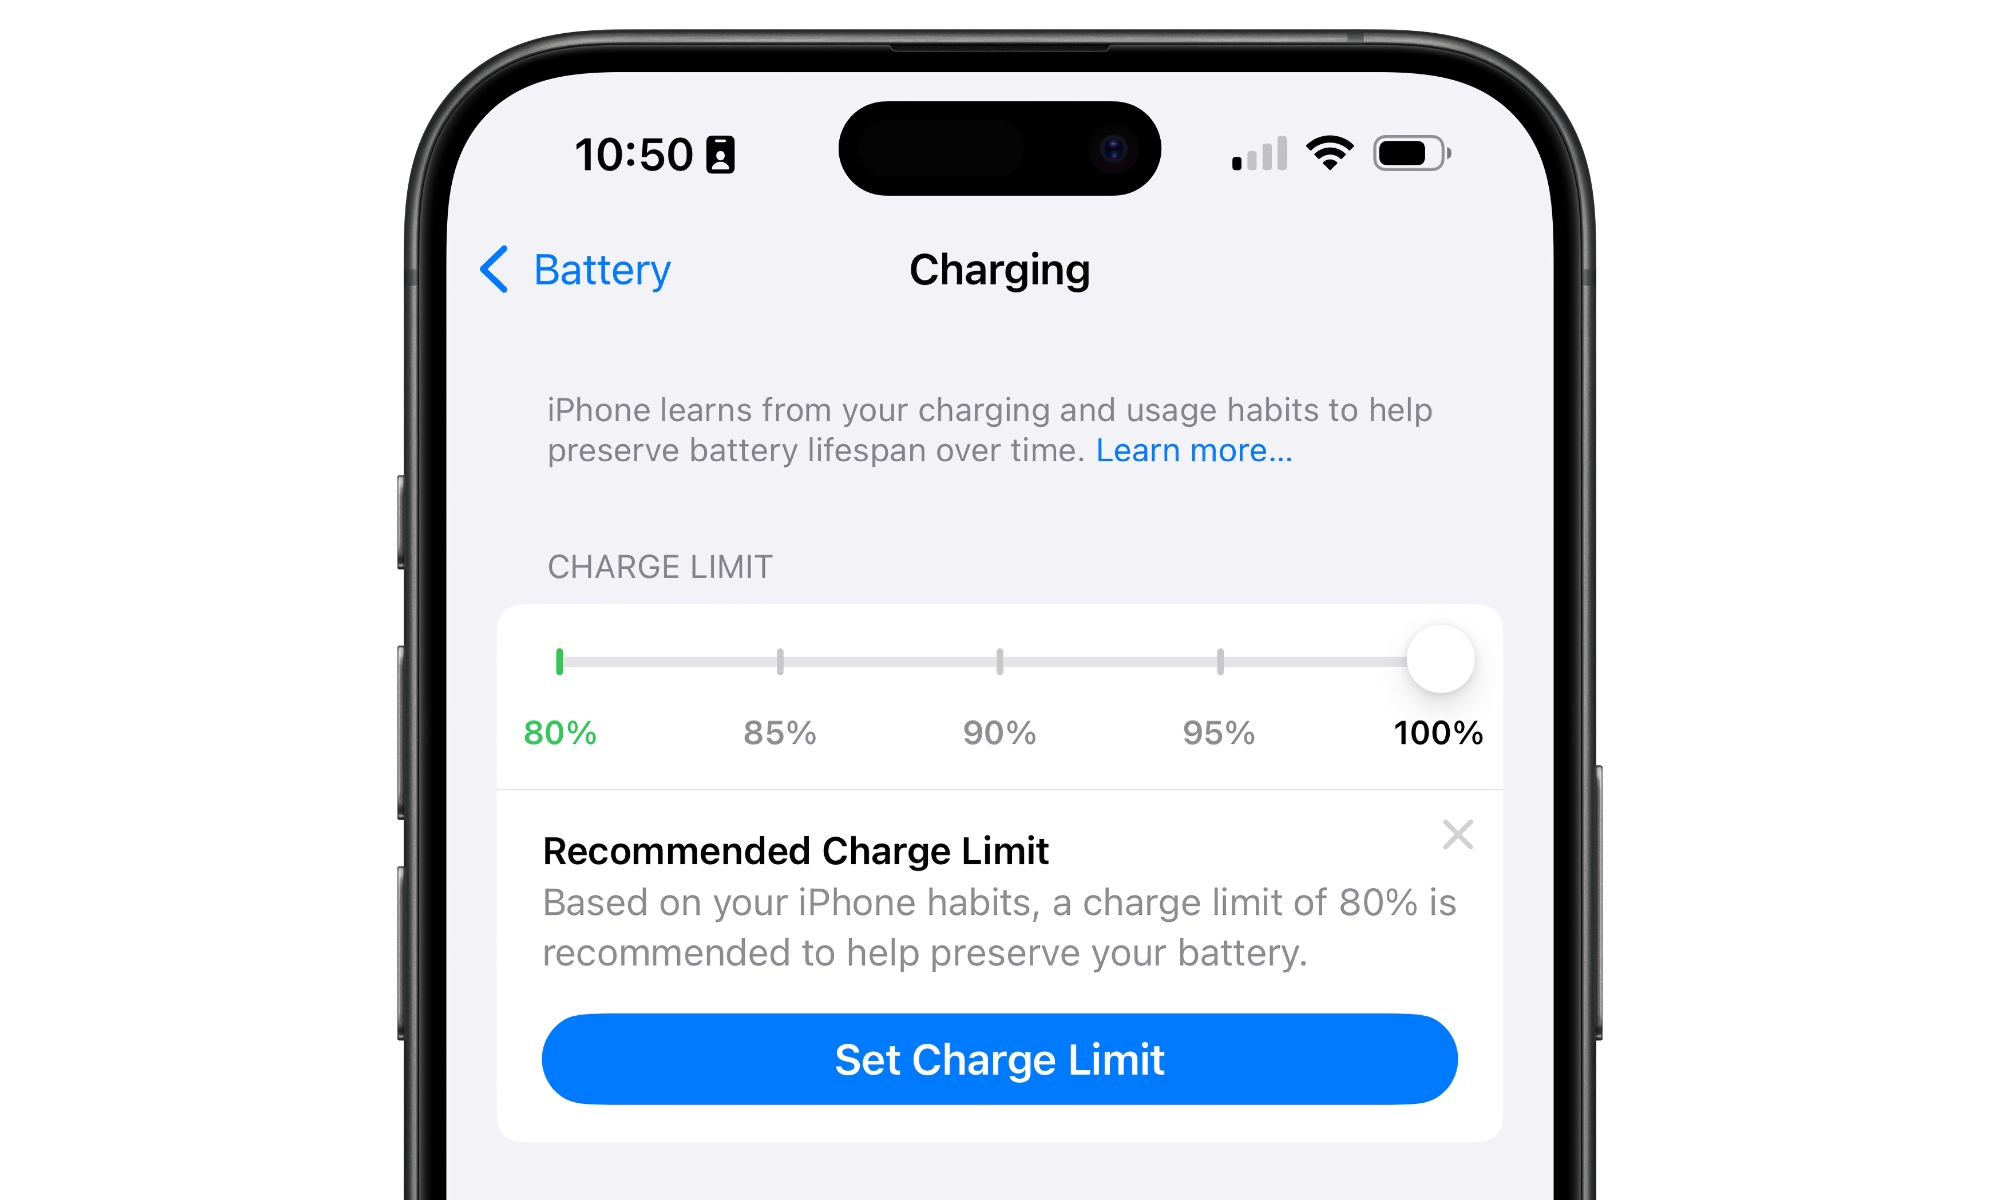
However, Apple knows this and added a feature in iOS 18 to help you set the charging limit on recent iPhone models. That way, you can set your iPhone to stop charging once it reaches 80% instead of 100%.
This will reduce the stress on your battery from constantly topping it up to maximum capacity and leaving it there, which can extend the longevity of your iPhone's battery.
Note that this feature is only available on the iPhone 15 and later models. Older iPhones can still use Optimized Battery Charging to minimize the time your iPhone charges above 80%, but there's no way to force it to stop there. Here's how to change your Charge Limit:
- Open the Settings app.
- Scroll down and tap on Battery.
- Go to Charging.
- Under Charge Limit, use the slider to set the charge limit you want for your iPhone.
After using your iPhone for long enough, you'll get a suggestion of your charge limit based on your iPhone habits. You can use that or set your own limit. However, you can only go as low as 80%.
Customize Your Control Center
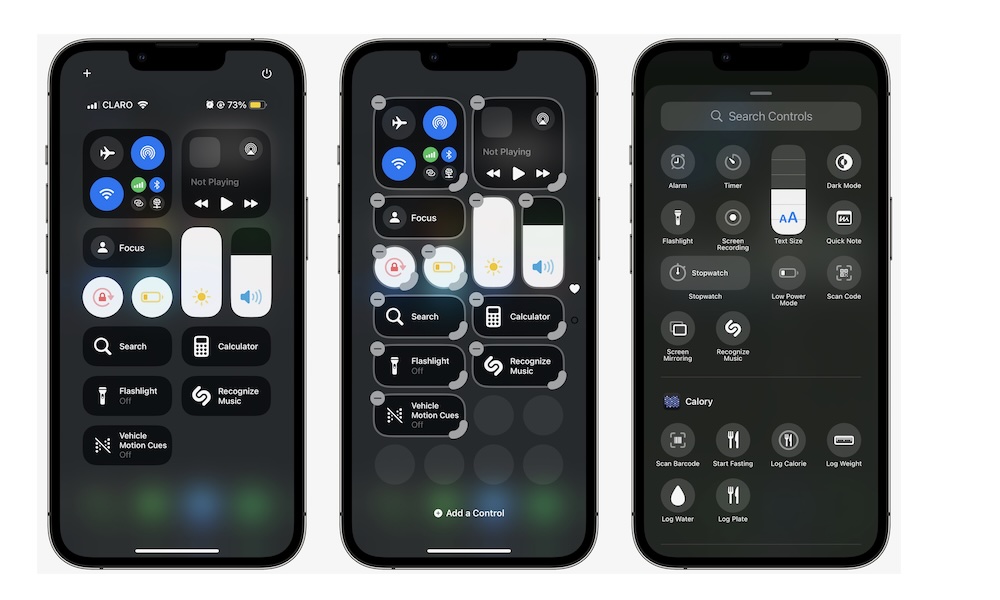
One of the biggest changes in iOS 18 is the ability to customize your Control Center. Now, you can remove and readjust every control in your Control Center or create different pages to keep your controls more organized.
The Control Center also now lets you have controls from third-party apps. Granted, the developer behind the app will need to add the control to iOS 18 for you to use it, but there are already plenty of apps with controls for you to use.
Here's how to customize your Control Center:
- Open your Control Center by swiping down from the top right corner if you have an iPhone with Face ID or swiping up from the bottom of your screen if you have an iPhone SE.
- Tap the plus icon in the top left corner of your screen.
- Tap the minus icon on the top left of each control to remove it from your Control Center.
- Tap on Add a Control and search for the control you want to add.
Customize Your Lock Screen Shortcuts
Many iPhone users have wanted this feature for years, and with iOS 18, Apple finally delivered. You can now change the two shortcuts at the bottom of the Lock Screen.
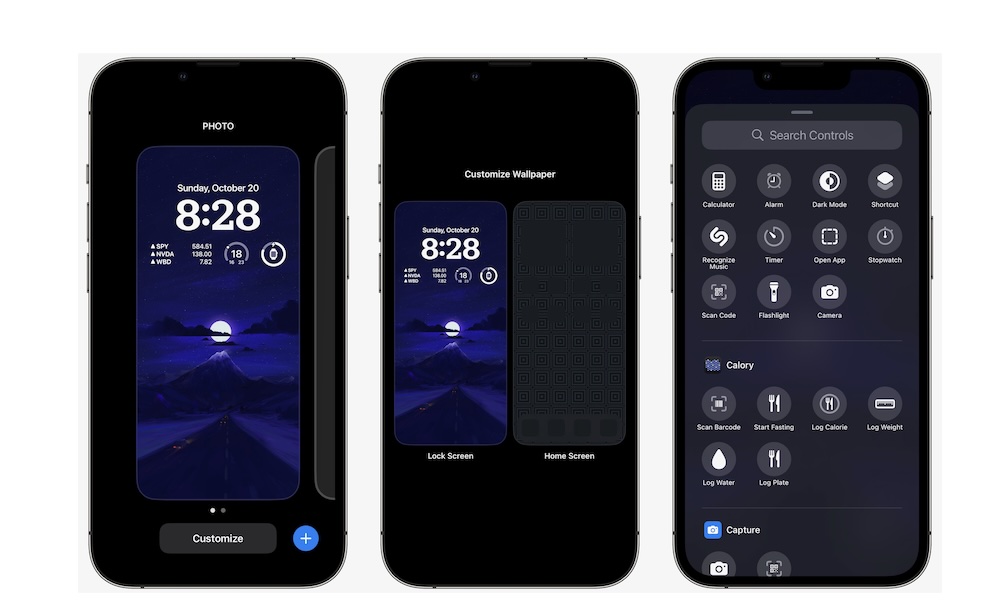
You don't have to stick with the flashlight or Camera app. Instead, you can add pretty much any shortcut you want, including shortcuts to open third-party apps. Here's how you can change them:
- Tap an hold in an empty space on your Lock Screen.
- Tap on Customize at the bottom of the screen.
- Select Lock Screen.
- Tap the minus button on the left side of each shortcut to remove it.
- Now tap the plus icon that appeared instead of the shortcut to add a new control.
- Choose the control you want to add.
- Repeat the same steps for the other control and then tap on Done.
- Tap on your Lock Screen's wallpaper.
Stop Sharing Your Data With Apple
With every big software update, Apple will ask you if you want to share specific data with it so it can help improve the iPhone.
But let's face it: Apple is more than capable of improving the iPhone and iOS by itself. Plus, sharing this data can be a little creepy.
To stop sharing your data with Apple, you need to make a couple of changes to the iPhone's Privacy and Security settings. Here's how:
- Open the Settings app.
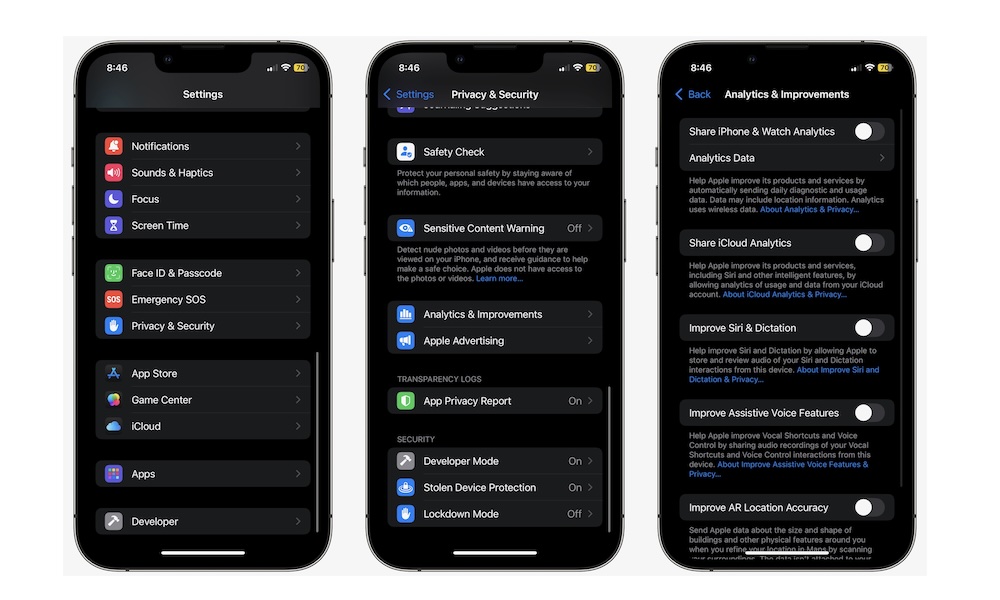
- Scroll down and go to Privacy & Security.
- Analytics & Improvements.
- Now, make sure that all of the options on that page are turned off.
- Next, go back to the previous page, scroll up, and tap on Location Services.
- Scroll down to the bottom and tap on System Services.
- Scroll down again, and under Product Improvement, disable iPhone Analytics, Routing & Traffic, and Improve Maps.
If you want to keep your data a bit more private, you can go back to the previous page and change the Location Services access for each app you use.
Allow Audio Playback While Using the Camera App
Has it ever happened to you that you're listening to music and accidentally open the Camera app? Then you probably know that your music will stop playing to give priority to the video you were supposed to take.
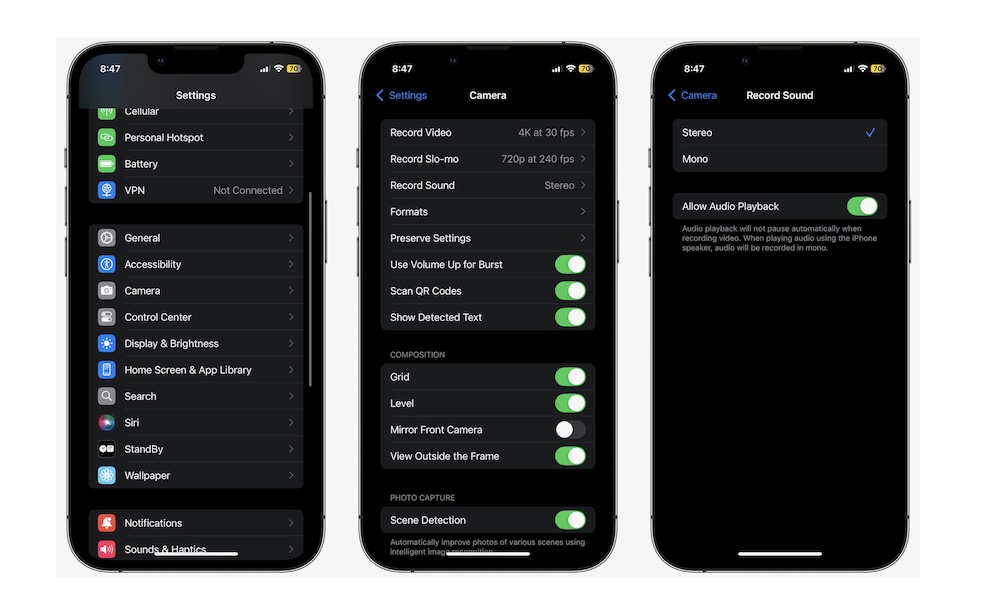
Yes, it's annoying, but Apple finally fixed it in iOS 18. Now, you can customize your settings so the music doesn't stop playing, even if you're getting ready to shoot a video.
This feature should be turned on by default, but you can make sure by doing the following:
- Open the Settings app.
- Scroll down and go to Camera.
- Tap on Record Sound.
- Make sure that Allow Audio Playback is turned on.
Constantly Rotate Your Private Wi-Fi Address
Apple added a privacy feature in iOS 14 to obscure your iPhone's hardware Wi-Fi address, making it harder for others to track your iPhone between Wi-Fi networks. However, while that chooses a random address whenever you connect to a new Wi-Fi network, that address stays the same each time you reconnect to the same network.
That's probably fine when you're at home, but it's enough to let public or school Wi-Fi networks know whenever your device returns, since it will use the same address each time.
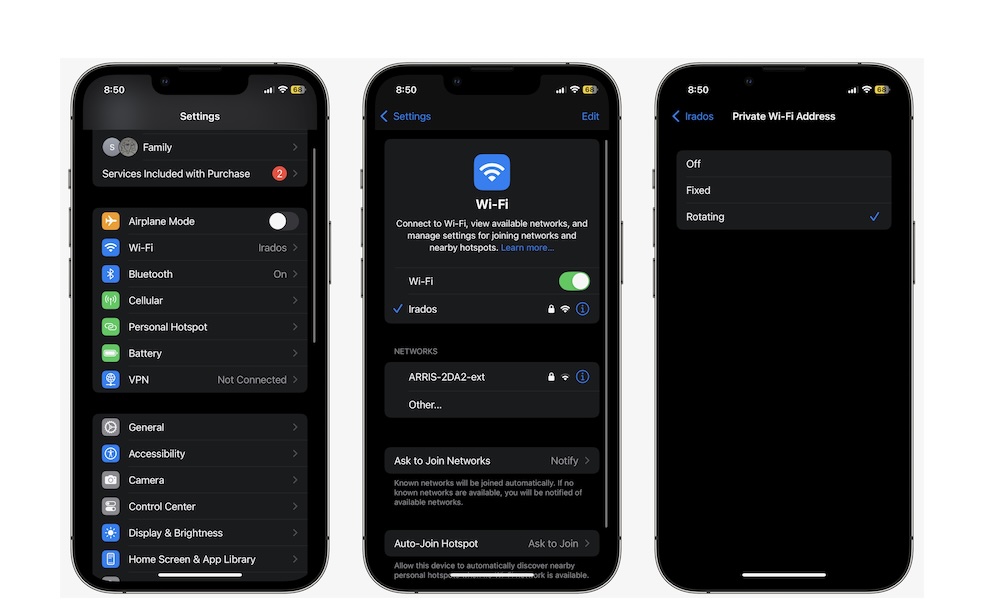
Luckily, iOS 18 brings a new feature that allows your iPhone to rotate to a new Wi-Fi address every time you reconnect, giving you even more anonymity. You have to enable this for each Wi-Fi network where you want to use it. Here's how:
- Open the Settings app.
- Tap on Wi-Fi.
- Tap the i icon next to the name of the Wi-Fi network you want to switch..
- Select Private Wi-Fi Address.
- Change it to Rotating.
The default "Fixed" option behaves like the Private Wi-Fi Address toggle did in previous iOS versions, and you can still use "Off" to switch back to your iPhone's true hardware Wi-Fi address on trusted networks.
Limit Apps' Access to Your Contacts
Many apps need access to your contacts to function. However, most apps don't need access to your complete list of contacts, especially if you use them with only a handful of people.
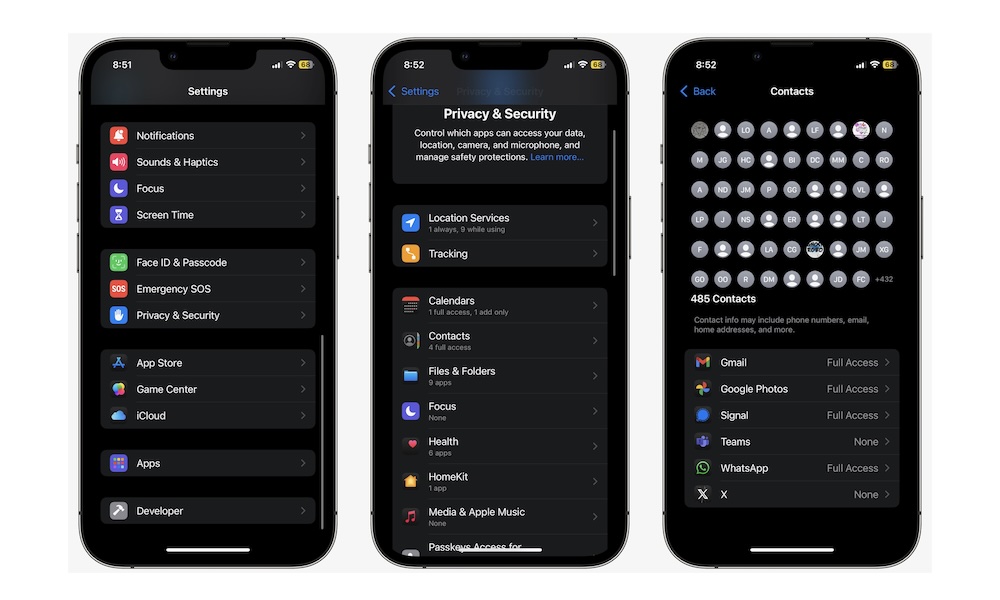
Apple knows this, so it added a new feature that lets you limit the access apps have to your contact list. This way, you can manually choose which contacts apps have access to and protect your complete contact list from being accessed.
- Open the Settings app.
- Scroll down and go to Privacy & Security.
- Scroll down again and tap on Contacts.
- Choose the app you want to limit.
- Tap on Limited Access instead of Full Access.
- Choose the contacts you want to share with the app.
Turn Off Game Mode
Apple introduced Game Mode for the iPhone with iOS 18. This is a really useful feature that will improve your gaming experience by reducing specific tasks in the background to improve performance.
Game Mode also improves Bluetooth to provide lower latency when you're using a Bluetooth controller or your AirPods.
With that said, unless you're playing a really demanding game, you might not need this feature at all, especially if you have a fairly new iPhone model.
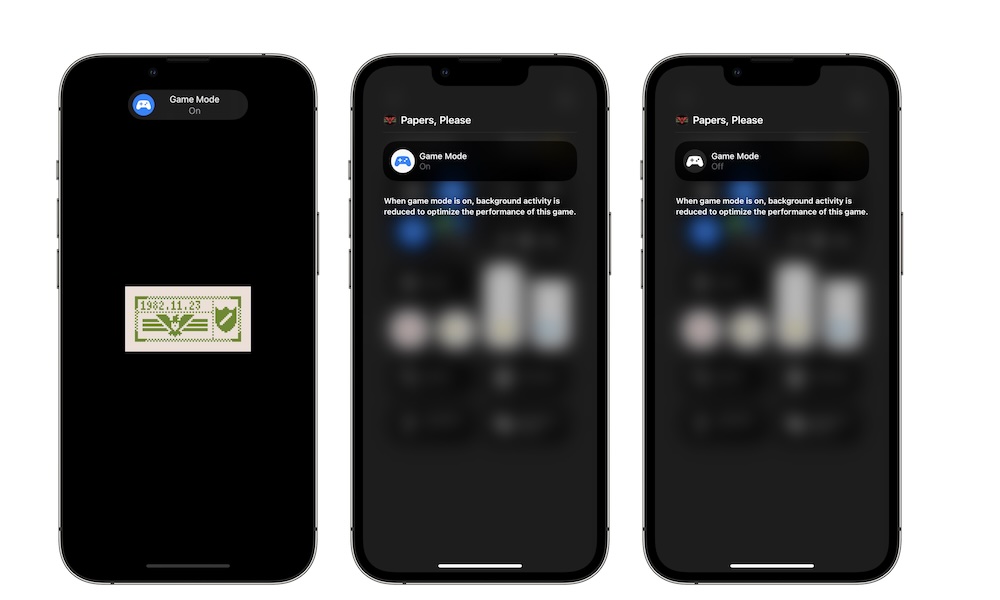
Fortunately, you can turn it off if you want. To disable game mode, simply open a game you want to play and tap the Game Mode message that appears at the top of your screen. You'll need to be quick, as that message disappears after a couple of seconds.
Finally, tap Game Mode to turn it off. And that's it. Again, you probably won't notice that big of a difference, but in the background, everything will be running as usual.
Change Your Calendar
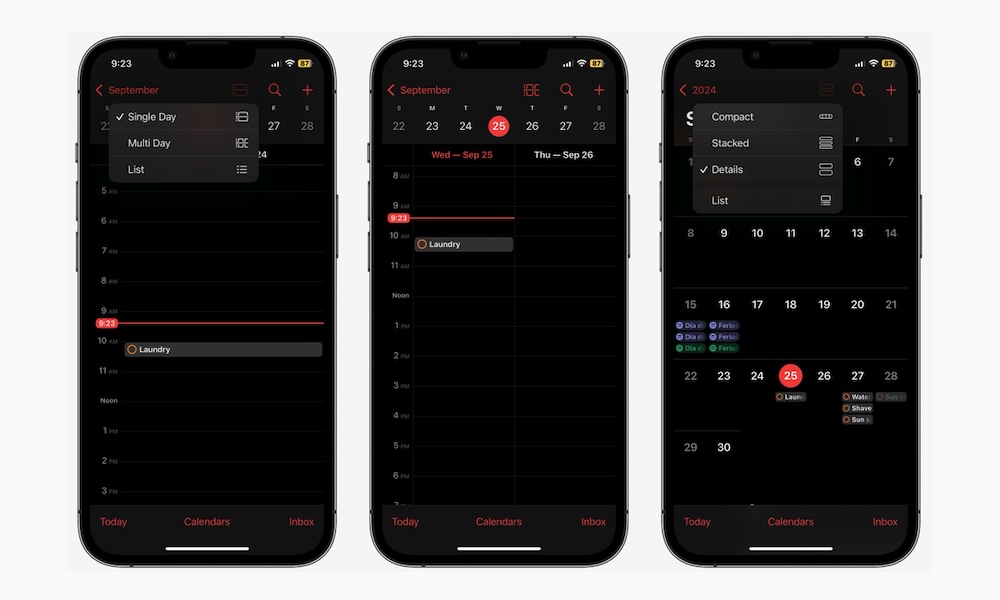
With iOS 18, the Calendar app got a few improvements. For starters, you can now see all your reminders in the app. You'll see the upcoming reminders as well as the ones you have already completed, which can be a bit overwhelming.
Fortunately, you can change this. Simply tap the Calendars button at the bottom of the screen. Then, scroll down to the bottom and disable Show Completed Reminders. You can also turn off Scheduled Reminders if you want to hide them all.
The Calendar app also offers some new ways of looking at your events. Tap the Stacked or Details button (located on the left side of the search button at the top), and then choose the view you want.
Compact View will only show you a pill-shaped icon with colors to represent your reminders, events, and important dates.
The stacked view shows a list of color-coded lines representing your reminders and events, while the details View shows a small preview of the event or reminder.
Add a Second Language to Your Groceries List
The Reminders app comes with a useful Grocery list that automatically sorts all the items you add so you can easily see what you need to get at the store.
The only problem is that if you want to add an item in another language, the list will not recognize it, so you'll have to write it in English. Fortunately, that changed with iOS 18.
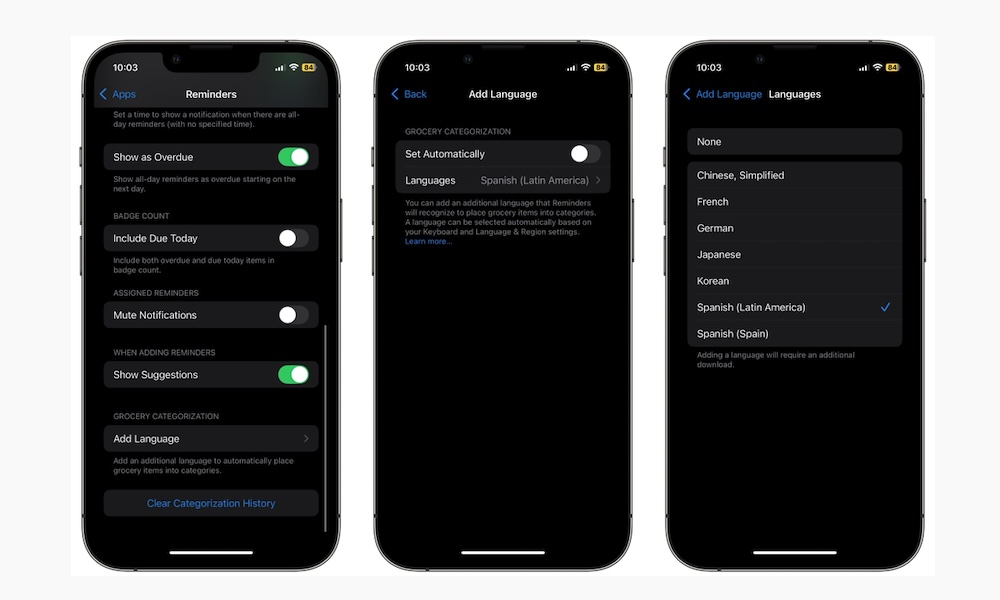
Now, you can add a second language, so it's easier to write your grocery list in any language you want. At the time of this writing, you can add seven languages, including Chinese (simplified), French, German, Japanese, Korean, Spanish (Latin America), and Spanish (Spain).
To add a language, you need to do the following:
- Open the Settings app.
- Scroll down to the bottom and tap on Apps.
- Scroll down again and go to Reminders.
- Scroll down again, and under Grocery Categorization, tap on Add Language.
- Tap on Languages.
- Choose the language you want to add.
Customize Your Home Screen
With iOS 18, you can finally rearrange your apps' icons however you want. You don't have to follow the same pattern, starting at the top left and finishing at the bottom right.
Now, you can literally have a single app in the middle of the screen if you want to.
All you need to do is press and hold your Home Screen until the apps start to jiggle. Next, move the apps to wherever you want and then tap on an empty space from the Home Screen. And that's it; your app will stay where you left it.
Change the Colors of the Icons on Your Home Screen
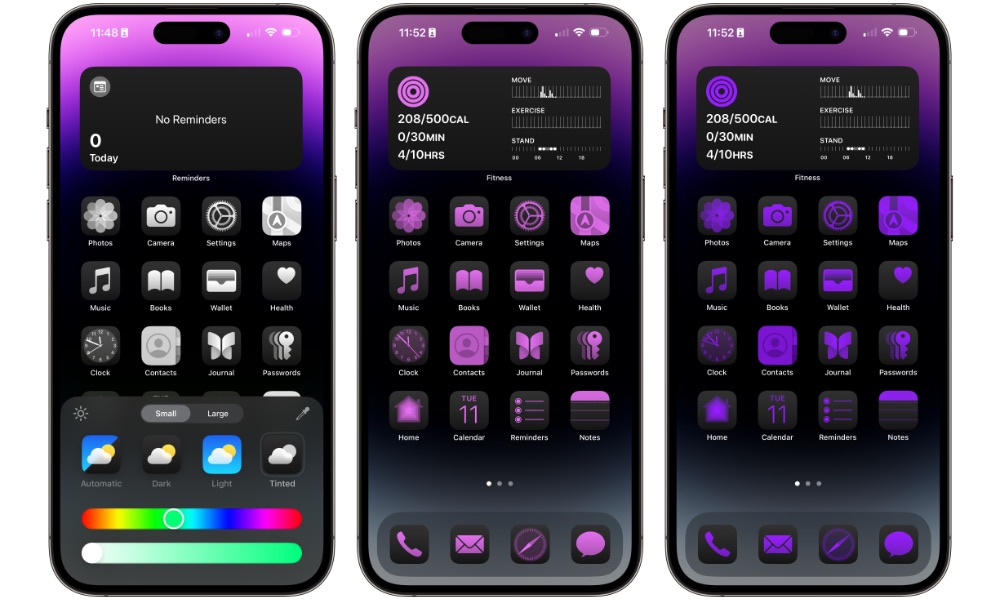
Apple added another customization feature to iOS 18: the ability to quickly change the color of your app icons.
For instance, you can switch from Light to Dark mode or use any type of color you want. Here's how:
- Press and hold an empty space in your Home Screen until the apps jiggle.
- Tap the Edit button in the top left corner of your screen.
- Choose Customize.
- Tap on Light, Dark, or Automatic at the bottom of your screen to keep the same dark or light theme as your iPhone.
- You can also choose Tinted to change the color of the app's icons to whatever you want.
The Dark option won't work with every app icon yet, as many developers still need to create their dark versions. However, the Tinted option will paint all apps without exceptions.
Hide or Lock Your Favorite Apps
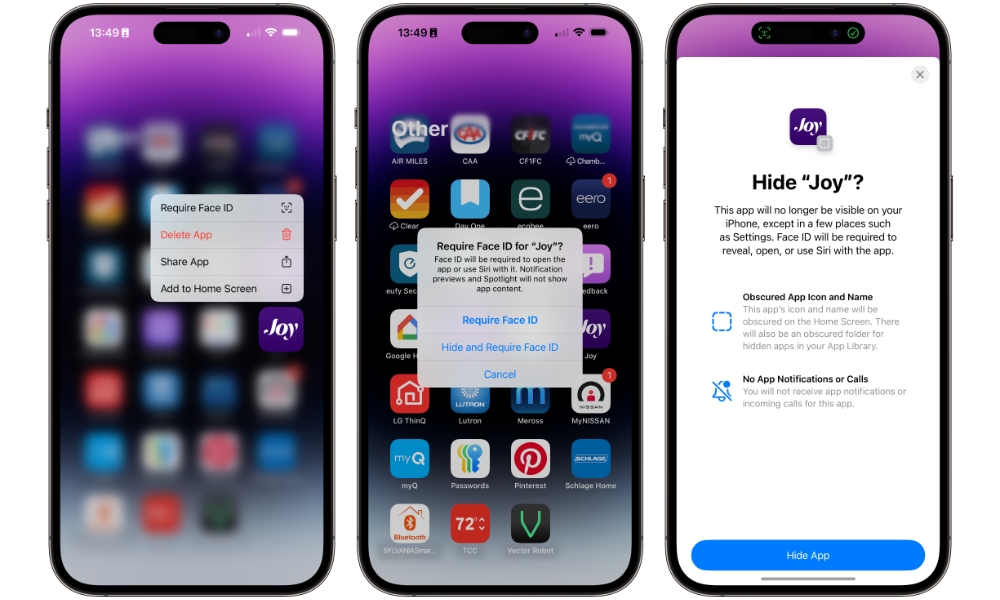
To keep things more private, iOS 18 lets you lock or hide your apps. This is pretty secure, as you'll need to use Face ID, Touch ID, or enter your passcode before you can access a locked app or even see a hidden one.
Here's how to lock or hide an app:
- Press and hold any app in your Home Screen or App Library until a menu pops up.
- Tap Require Face ID.
- Choose Require Face ID or Hide and Require Face ID.
- Use Face ID to confirm your decision.
And that's it. Now you'll need your Face ID or passcode to unlock an app. If you hide an app, you'll need to scroll down to the bottom of the App Library, where you'll find the hidden folder that will have all your hidden apps — but you won't be able to see what's inside until you authenticate.
If you change your mind and don't want to use Face ID to unlock an app, simply press and hold it and select Don't Require Face ID.
Get Rid of the Blinking Cursor
Granted, this is a feature that not everyone needs, but it's still good to have it.
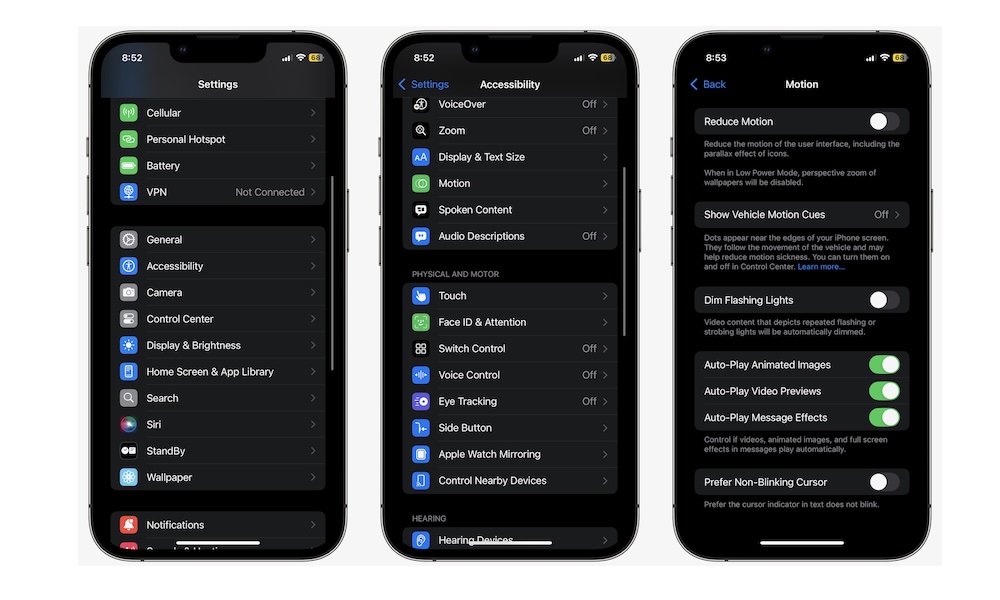
Have you noticed how the cursor starts to blink repeatedly when you tap a text field? Some of us might not like that, which is why iOS 18 lets you remove the blinking effect from the cursor. This is how:
- Open the Settings app.
- Scroll down and go to Accessibility.
- Tap on Motion.
- At the bottom of the screen, turn on Prefer Non-Blinking Cursor.
Set Up Stolen Device Protection
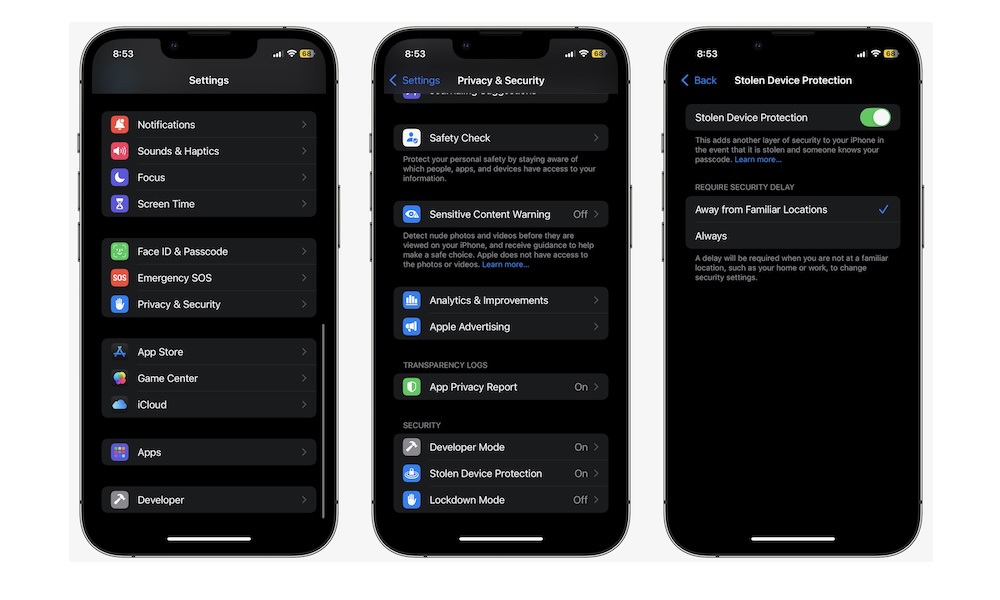
Stolen Device Protection is a useful feature that protects your data by requiring biometric authentication — Face ID or Touch ID — to change security settings or access locked and hidden apps. It also enforces a one-hour delay before any critical settings can be changed, with Face ID or Touch ID required at the beginning and end of that hour.
This means that even if someone knows your passcode, they won't be able to change any critical settings or access your sensitive apps, and a thief definitely won't be able to lock you out of your Apple ID just because they were looking over your shoulder when you entered your passcode. This also gives you more time to recover or remotely wipe your iPhone if it's stolen.
You've probably heard of this feature before, but the full version of iOS 18 changed the location of this setting, and this is how you'll need to change it moving forward:
- Open the Settings app.
- Scroll down and tap on Privacy & Security.
- Scroll down to the bottom of the screen and tap on Stolen Device Protection.
- Enable Stolen Device Protection.
Under Require Security Delay, you can choose Away from Familiar Locations if you want to be able to change security settings and fall back to using your passcode in places you frequent, such as your home or office. Choosing Always will enforce biometric authentication and the security delay no matter where you are (which means you'll also need to wait an hour if you ever want to change it back to "familiar locations").

