
12 Tips to Make the Most Out of Apple Notes on Mac
 Credit: Apple
Apple Notes is one of the best note-taking apps for iPhone, iPad, and Mac. Not only is it a pretty complete app with everything you need to meet your note-taking needs, but since it's a first-party app, it works perfectly well with any Apple device.
What's more, Apple is constantly updating the Notes app and introducing many new and cool features you can try as soon as you update your Apple device.
Of course, if you want to get the most out of the Notes app, you'll need to use it properly. Luckily, there are plenty of ways to master it, especially on your Mac.
From dictating instead of writing to exporting your notes into any file you want, read on for a dozen tips that will help you master the Notes app on your Mac.
Organize Your Notes With Tags
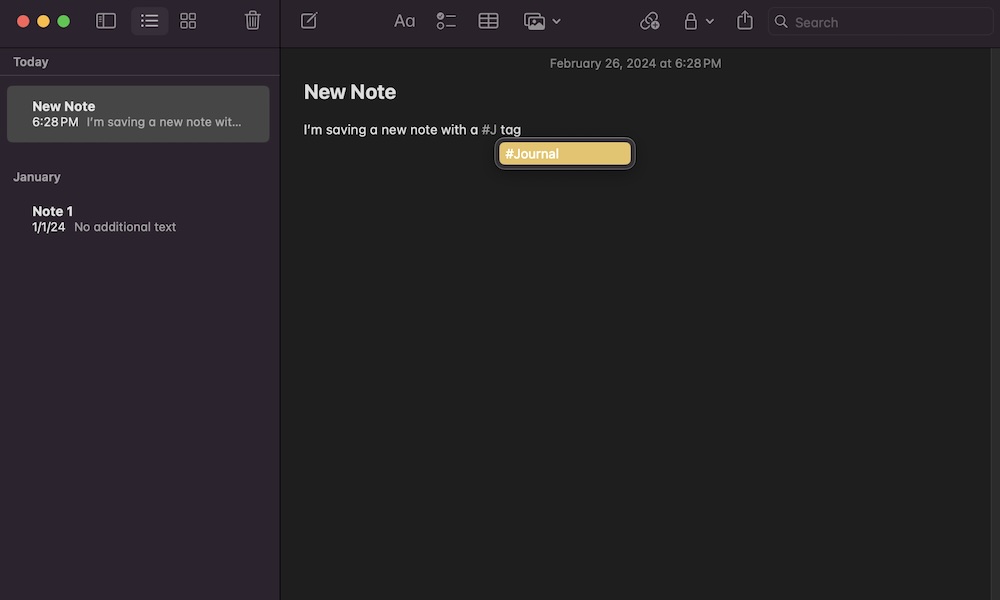
Once you start using Apple Notes seriously, you'll quickly end up with dozens of notes stored on your Mac. While there's nothing wrong with that, it can be a bit tricky to keep them all organized if you aren't careful.
That's why Apple implemented a simple but powerful tag system to help you keep all your notes organized. With tags, it's easier to label your notes with specific categories, like work or school.
Creating tags is extremely easy. The first thing you need to do is open or create a note that you want to tag. Next, write the pound or hash symbol (#), followed by the word or phrase you wish to use as a tag.
For instance, you can use something like "#school" or "#journal," and your Mac will automatically create a new tag. Keep in mind that you can't use spaces when creating a tag, so using something like "#school project" will only make a "school" tag followed by the word "project."
Instead, you need to use a hyphen or uppercase letters like "#school-project" or "#SchoolProject."
After you create your new tag, you can use it on as many notes as you want. To search for those notes, click the Tags option on the left sidebar of the Notes app and then choose the tag you wish to search for.
Start using Smart Folders

Smart Folders are a clever solution for keeping all your notes in one place.
Just like regular folders, you can keep any type of note you want inside a Smart Folder. However, you do this by adding specific filters that the Smart Folder will look for. For instance, you can add a filter so the Smart Folder only shows you the notes you created today or shows notes that have a specific tag.
After you set the filters, the Smart Folder will automatically show you all the notes that meet your criteria. Keep in mind that the notes won't be moved to the new Smart Folder; instead, they'll be shown to you while keeping them in their original folder.
To create a Smart Folder on your Mac, you need to:
- Open the Notes app.
- Click the File button at the top of your screen.
- Select New Smart Folder.
- Add a name to your Smart Folder.
- Near the bottom of the screen, click on Tags to select the option you want to use, and then click on the drop-down menu next to it to select the filter you want.
- You can also tap the plus button on the far right to add another filter.
Use Notes to Do Your Math Homework
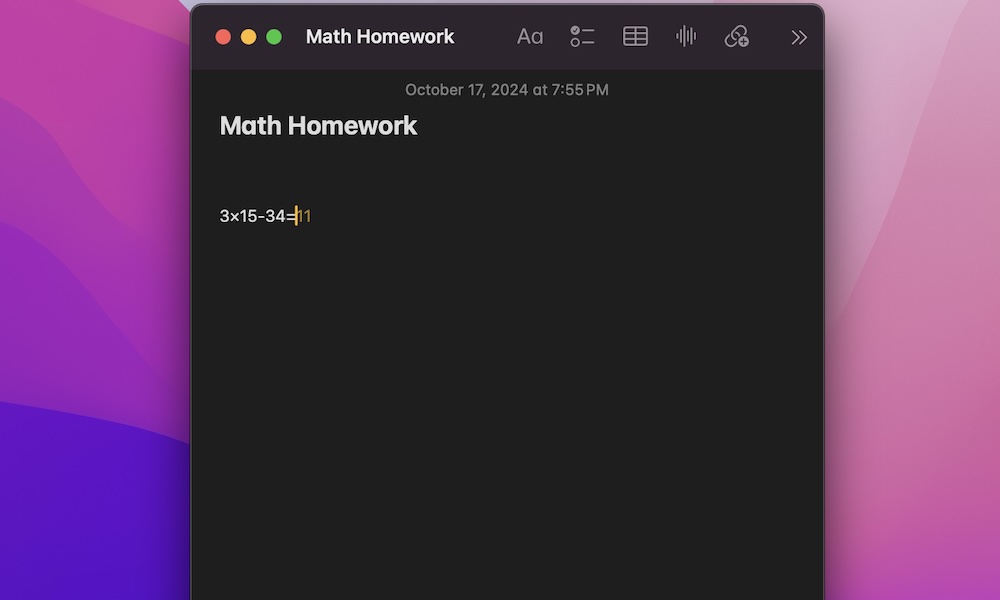
Now, your Mac can solve math calculations and equations for you. This is thanks to a new feature called Math Notes, which is exclusive to macOS Sequoia, iOS 18, and iPadOS 18.
If you've installed the latest software update, Math Notes will help you solve math problems. All you need to do is write the calculation you want, and the Notes app will solve it for you. It can even solve more complex equations or create graphs automatically.
There are a couple of ways to start using Math Notes, but the fastest way is to open the Notes app and write any calculation you want. For instance, you can write something like "43x32=", and the Notes app will show the result on the right side. Press the Return key to solve the calculation.
You can also access Math Notes by going to the Calculator app, clicking the calculator icon at the bottom left, and selecting Math Notes.
You'll know the Notes app solved the calculation if the font has a gold color.
Create Notes With Your Voice
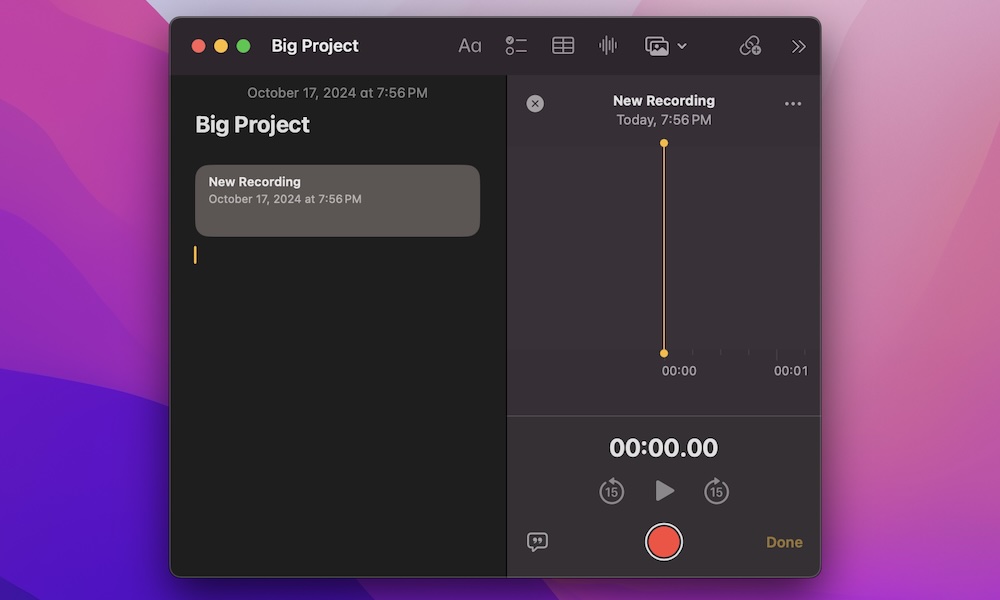
Another feature available after installing macOS Sequoia will let you record your voice when creating a note.
The Notes app on your Mac will not only record your voice but also transcribe everything you say so you can read or listen to it. This feature is perfect if you take your Mac to school or to meetings, and it will help you find, edit, or study anything you record.
To start recording your notes, open a new note and click the Record Audio button at the top of the note's window.
Then, click the red button at the bottom to start recording. When you finish your recording, simply click on Done in the bottom right corner of the note.
And that's it. After you click Done, you'll see the transcription at the bottom of the recording. You can add as many recordings to the same note as you want. If you want to delete it, simply click the recording to select it and then click the delete key on your keyboard.
Highlight the Most Important Parts of Your Notes
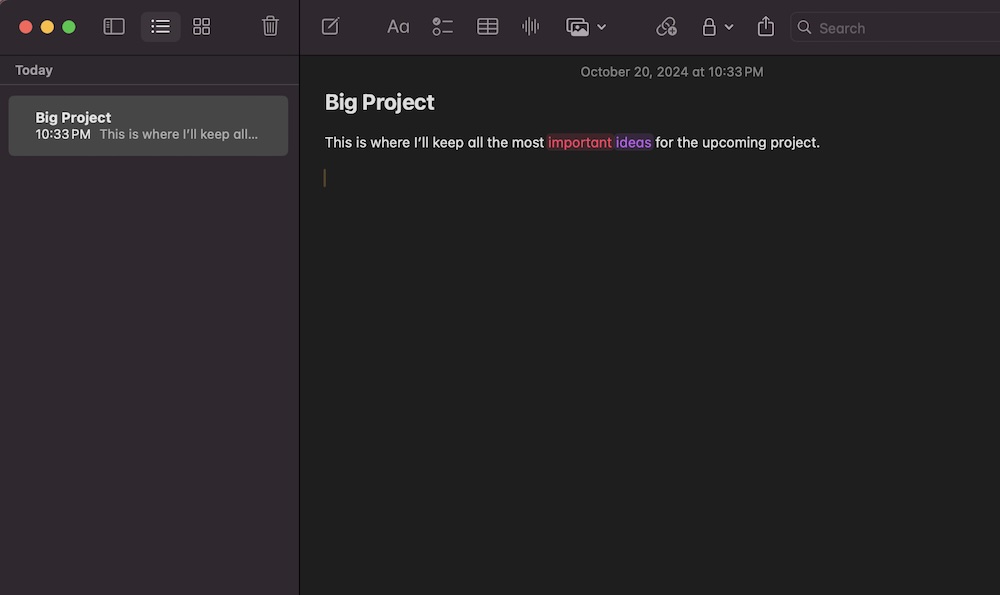
With macOS Sequoia, it's easier than ever to make highlights on your notes. That way, you can make the important parts of your notes stand out from the rest.
You can highlight regular text, titles, or headings and choose from five colors: purple, pink, orange, mint, and blue.
To highlight some text, all you need to do is select it with your mouse and then click the Aa button at the top of the note's window. Then, click the highlighter button on the left side of the menu that appears on your screen. If you want, you can click the color next to the highlight to choose a different option.
To remove a highlight, select the highlighted text and click the highlighter button again.
Collapse Your Titles to Make Your Notes Easier to Skim
If you use your Mac to take notes in school or for work, you probably have some long and messy notes, and you likely already know how hard it is to find the title or section you're looking for.
Fortunately, you can make your notes easier to skim through. This is thanks to a new feature called Collapsible Sections. This feature lets you collapse all the text below a title, heading, or subheading to hide it so your note looks smaller and easier to read.
That way, when you find the section you were looking for, you can expand the text once more and only focus on that specific part of your note.
To use Collapsible sections, click the Aa button at the top of the window and select Title, Heading, or Subheading. Then, write the title and content you want for that section below it.
Next, to collapse that section, hover your mouse over the title or heading. You'll see a downward-pointing arrow on its left side. Click it to collapse that section, and click it again to expand it.
When you click that arrow, the Notes app will collapse every line of text below the title or heading until it finds another title or heading. So, make sure to create titles to keep your notes more organized and easier to collapse.
Export Your Notes as PDF Files
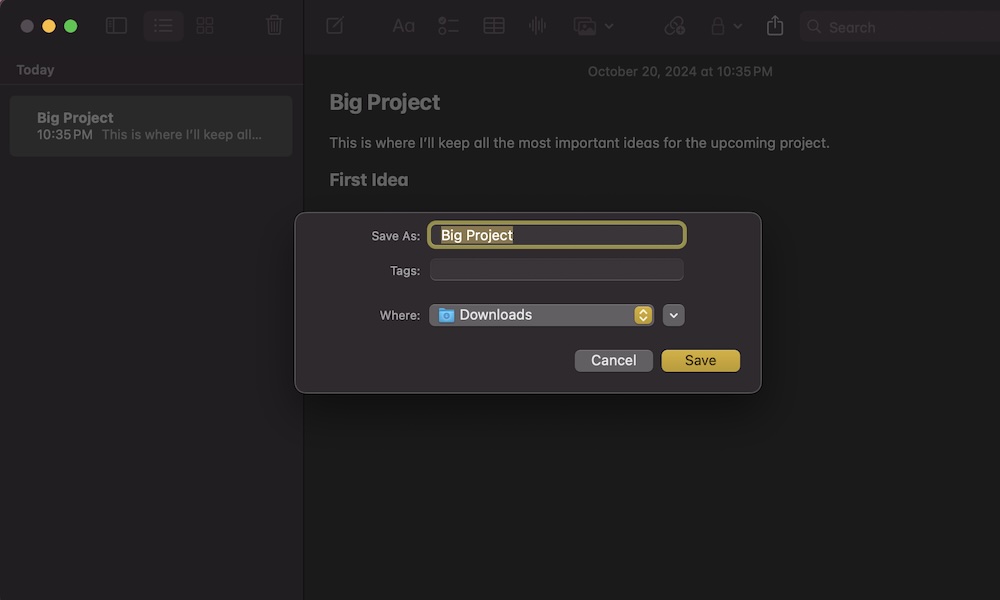
One of the best parts about the Notes app is that you don't have to keep everything as a note. You can move your notes and use them in the Pages app — more on that later — or export them as PDF files so they're easier to share across multiple devices.
Here's how to export your Notes as PDF files:
- Choose the note you want to export.
- Click the File button in the top left corner of your screen.
- Click on Export as PDF.
- Enter a name for your note, add tags if desired, and select the folder where you'd like to store the PDF file.
- Click on Save.
After a couple of seconds, you should see the new PDF file in the folder you selected.
Edit a Note in the Pages App
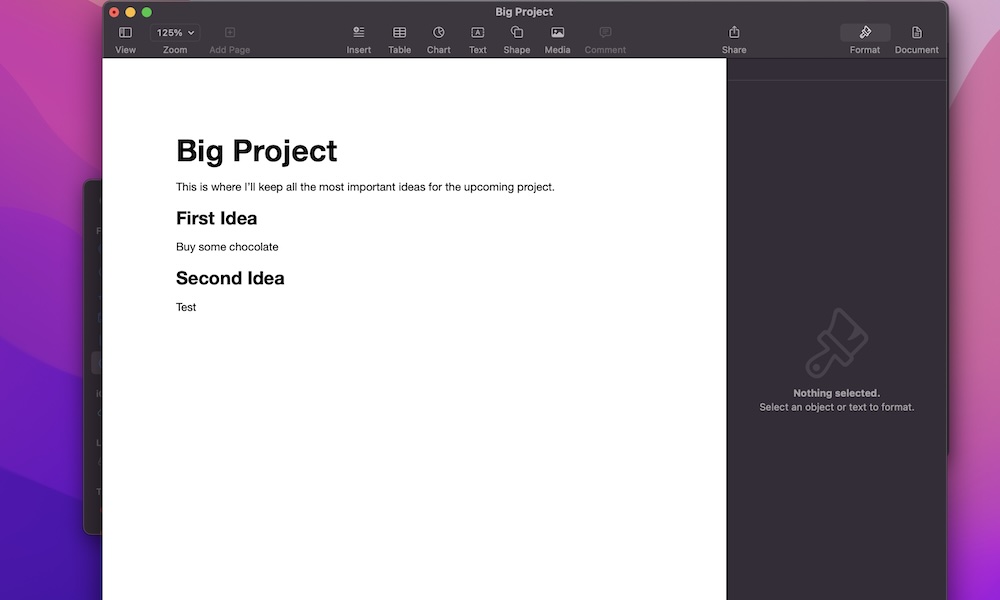
The Pages app is Apple's alternative to Microsoft Word. It works just like Word, and Pages is part of the Apple ecosystem, which offers other benefits.
One of these benefits is being able to move your notes from the Notes app onto Pages. This will give you a bit more options to customize your notes and make them look more professional. This is how you do it.
- Open the note you want to open in Pages.
- Click the File button near the top left corner of your Mac's screen.
- Select Open in Pages.
Give your Mac a few moments, and the Pages app will open up with your note.
As an additional tip: If you prefer Word, you can still move your notes to the Microsoft Word app on your Mac. It just takes one extra step.
After you open the note in Pages, click the File button in the top left corner and click on Export to. Next, select Word, click on Save, and then click on Export. And that's it! Your Note now can be viewed and edited in Word.
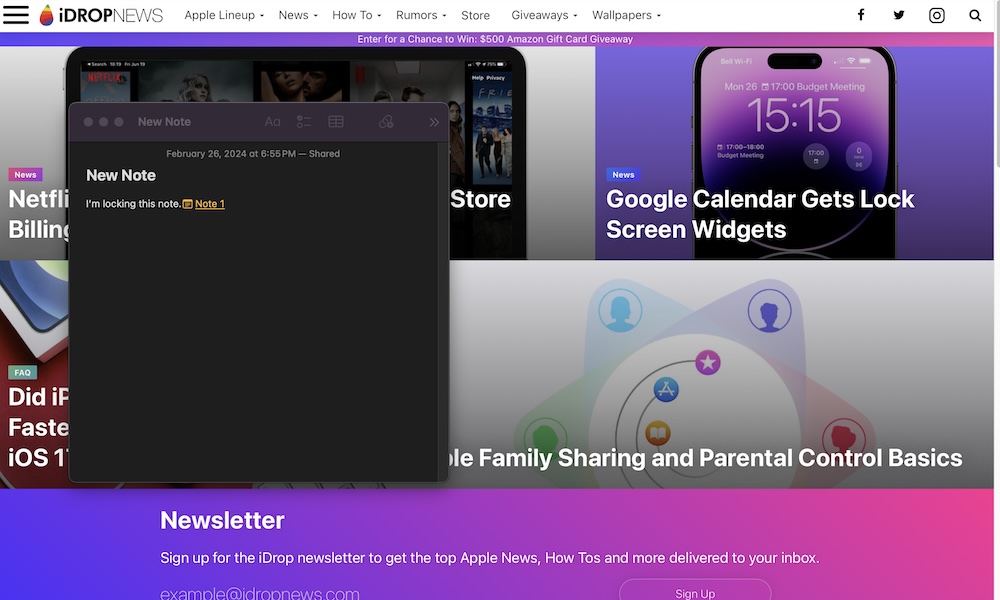
Lock Your Notes to Keep Them Private
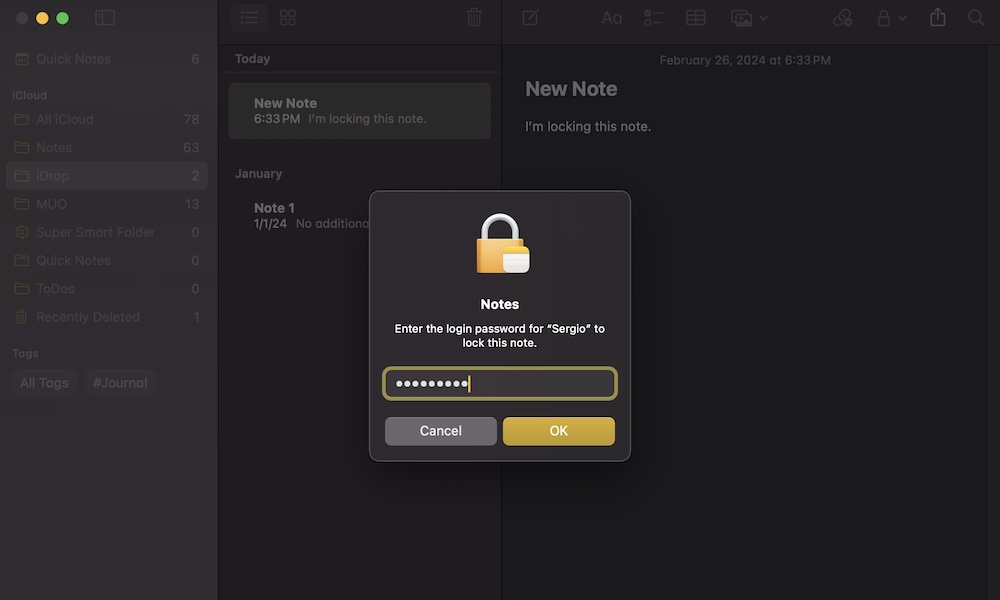
The Notes app has you covered when it comes to privacy. You can lock any note in the app, so you're the only one who can access it.
Here's how to lock a note:
- Open the note you want to lock.
- Click the Lock button near the top right corner of the window.
- Enter your Mac's password and click OK.
- Your note will now have a lock, but it won't be locked immediately. To lock it, click the same Lock button at the top and select Close All Locked Notes.
The Notes app will close all your locked notes, and you will only be able to unlock them by using your Mac's password or Touch ID sensor. Also, whenever you close the Notes app or lock your Mac, the notes will get locked again.
If you want to remove the lock of any note, simply click the Lock button at the top of the window and select Remove Lock.
Start Using Quick Notes
We've all had moments when we need to write something down as quickly as possible. Even if your Mac is the fastest model available, opening a brand new note from the Notes app might still take some time.
Fortunately, you don't have to. There's a feature called Quick Notes that basically lets you have open notes at all times. When this feature is turned on, you can open a Quick Note from one of the corners of your Mac and start writing anything down in seconds.
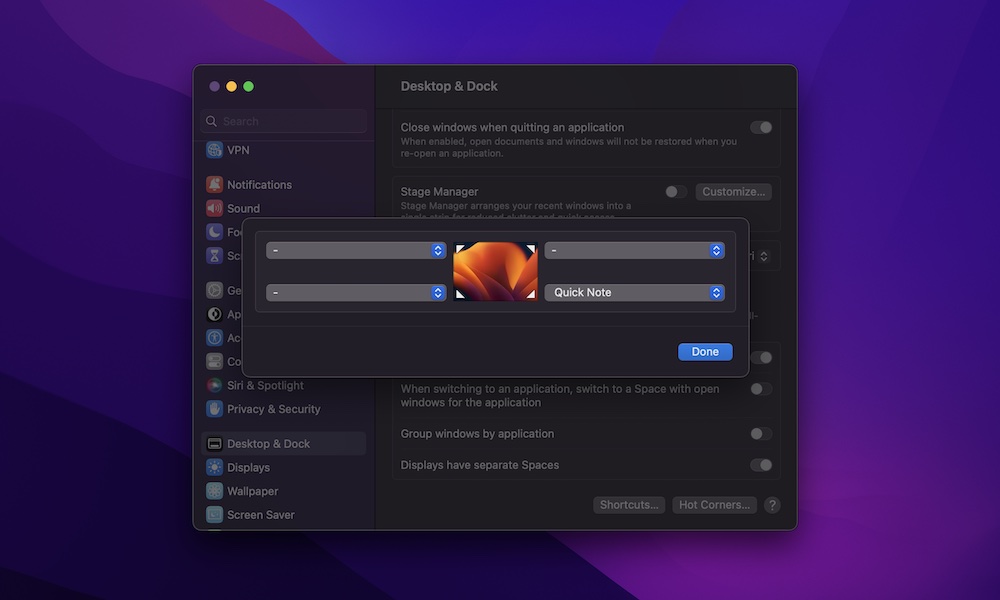
You can use this feature thanks to your Mac's Hot Corners, which lets you do specific actions by hovering your mouse over one of the corners of your screen. Here's how to add Quick Notes to one of your Hot Corners:
- Click the Apple menu in the top left corner of your screen.
- Go to System Settings.
- Scroll down on the left sidebar and click on Desktop & Dock.
- Scroll down to the bottom of the page and click on Hot Corners in the bottom left corner.
- Click on the corner you want to use to open a Quick Note.
- Select Quick Note in the drop-down menu.
- Click on Done.
Now, all you need to do is hover your mouse in your selected corner. You'll see the corner of a note appear on your screen. Click on it, and a new Quick Note will pop up.
These notes will be automatically stored in the Notes app, and they can be found in the Quick Notes folder.
Make Any Note Float on Top of Your Screen
The Notes app has a weird feature that lets you keep a note on top of any window at all times. Granted, it might not always be useful, but it's one of those features that's better to have and not need than to need and not have.
Here's how to use this feature:
- Open the Notes app.
- Select the note you want to keep floating
- Click on Window at the top of your Mac's screen.
- Select Open Notes in a New Window.
- Now, click the Windows button one more time.
- Select Keep on Top.
Now, no matter which app you open, the selected note will remain in the foreground at all times. This can be pretty useful if you're using a note you took as a reference for homework or a project.
To disable this feature, click the Window button and make sure that the option Keep on Top doesn't have a checkmark.
Let Others View and Edit Your Notes
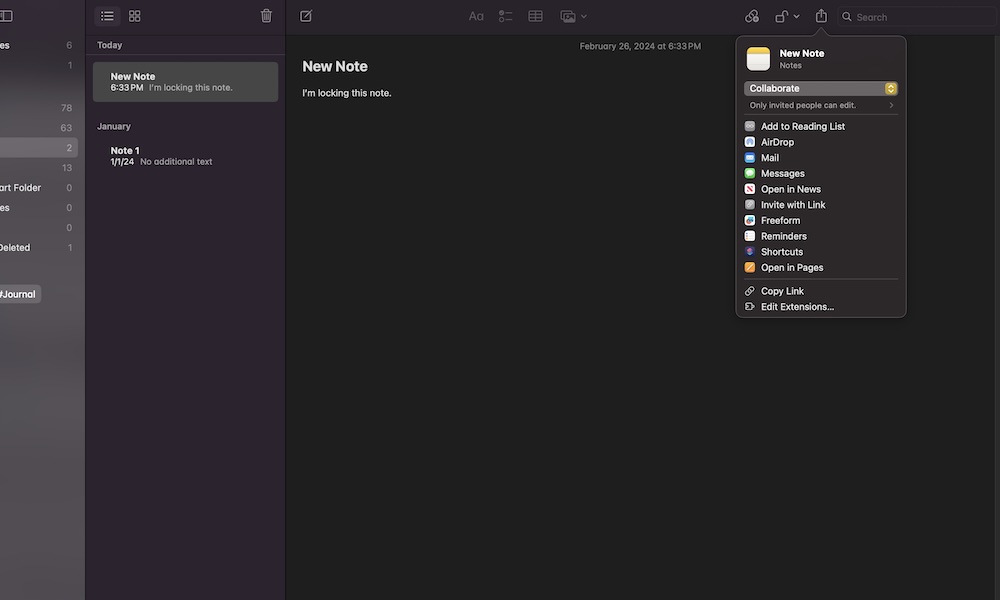
You don't need to keep your notes to yourself if you don't want to. That's because the Notes app lets you share any note with other people who have Apple devices. You can choose if you just want to show your notes or if you want to let them edit them. This is how:
- Open the note you want to share.
- Click the Share button at the top of the window.
- Make sure to select Collaborate if you want other people to edit your note. Choose Send a copy if you want them to have a copy of your note but don't want them to see any future changes you make or let them edit the original.
- If you choose Collaborate, click on Only invited people can edit right below it so you can choose who can access your note and if they can edit or just view it.
- Share your notes however you want.
And that's it. Remember that if you collaborate with someone else, you'll be able to see who changed your note and what changes they made.