
7 Hidden iPhone Tricks You’ll Definitely Want to Try in iOS 15.1+
 Credit: Velimir Zeland / Shutterstock
There’s so much new stuff packed into Apple's latest major OS updates that it’s easy to miss out on many of the smaller quality-of-life enhancements that are in here. From iOS 15 to macOS 12 Monterey, there’s more you can do on your iPhone, iPad, and Mac to make your life more fun and productive than you probably realize.
Apple’s big “tentpole” features only scratch the surface, in fact, and there’s even more to dig into when you consider that not everything promised for the iOS 15 era gets delivered in iOS 15.0. There are some exciting features in iOS 15.1 that were released earlier this week, and we’re sure there will be more to come in iOS 15.2 and beyond.
The same is also true for macOS 12 Monterey, which also just landed this week, not to mention Apple’s tvOS, watchOS, and HomePod Software updates. Read on for seven other handy things you can do with Apple’s latest software releases.
Add Vaccine Cards and More to Wallet with 'Live Text'
You’ve been able to scan QR codes with your iPhone camera for a few years now, and this year Apple has enhanced that to add support for COVID-19 vaccines cards and other SMART Health cards in the Health and Wallet apps.
With iOS 15.0, you could add your SMART-compatible vaccination card to the Health app, while iOS 15.1 expands that to let you place a more easily accessible version of the card right alongside your payment and loyalty cards in Apple Wallet.
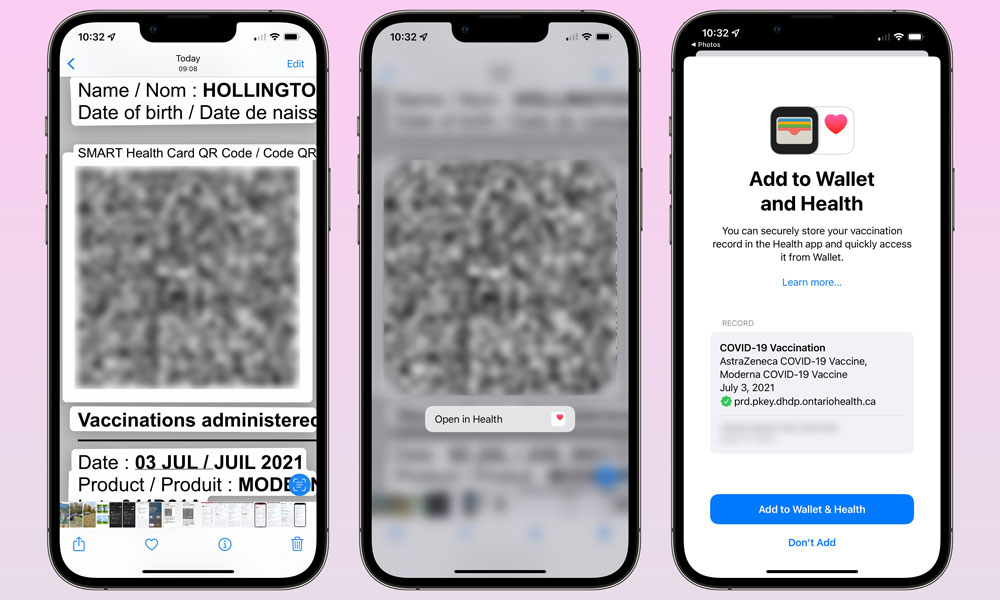
Adding a vaccination card normally requires scanning the QR code with the iPhone camera, which of course means you need to either print it out or have it displayed on your Mac or iPad screen, so you can point your camera at it, but it turns out that there’s one easier way, thanks to iOS 15’s new Live Text feature.
As first shared by iPhone in Canada reader Andrew Escobar, the new Live Text feature doesn’t just recognize text — it can also be used to scan QR codes from images, such as those saved to the Photos library.
This means that you can take a screenshot of a QR code and then “scan” that with Live Text to act on it. To do this with a vaccination card:
- Obtain the vaccination QR code from your appropriate government health agency and view it on your iPhone.
- Zoom in on the web page or PDF containing the QR code so that it takes up most of your iPhone screen.
- Take a screenshot by simultaneously pressing the volume up and sleep/wake button.
- Open the Photos app and locate the screenshot of the saved QR code.
- Tap the 'Live Text' button in the bottom-right corner. The icon will turn blue and any text and QR codes in the photo will be highlighted.
- Tap and hold on the QR code.
- Tap Open in Health from the pop-up menu that appears.
- Proceed to add your vaccine card to your Wallet and Health app in the normal way.
This doesn’t just work for vaccine cards, either. You can use Live Text to scan any QR code that happens to be in your photo library, or even those found in photos in third-party apps like Facebook and Instagram, allowing you to read other information from them and even visit the web links that they reference.
AutoPlay Music When Hopping in the Car
Apple’s Shortcuts app may be one of the best things to come to iOS in recent years. It hides a lot of power, opening up all sorts of new capabilities on your iPhone and iPad — and now with macOS 12 Monterey, it’s available on your Mac, too.
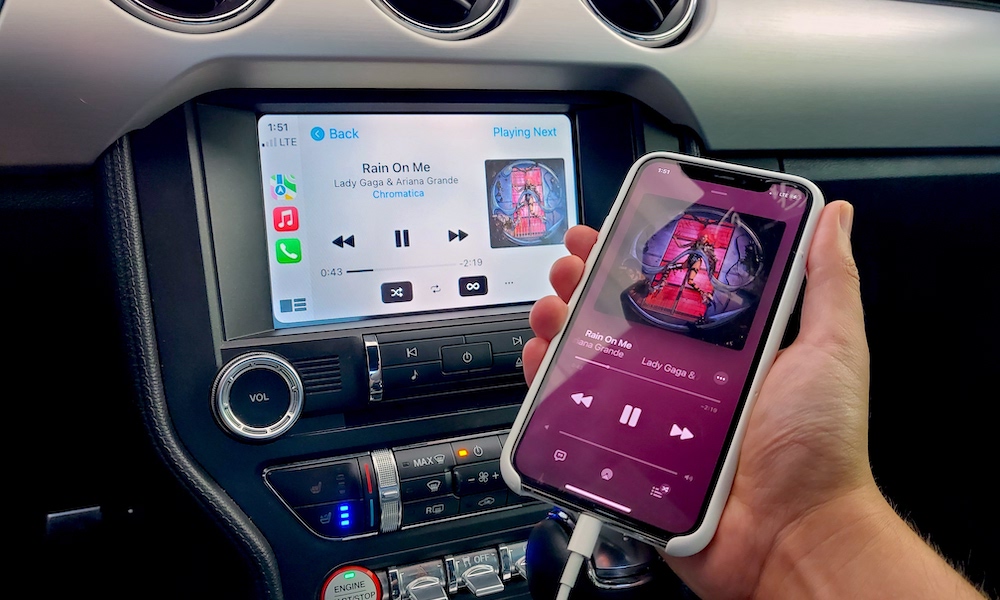
One great trick shared this past summer by our own Managing Editor, Elijah Fox, lets you automatically start up your favourite tunes whenever you hop in the car and connect to CarPlay.
The secret sauce here is that shortcuts in iOS 15 can be kicked off by a whole variety of different triggers, and some of them are actually quite powerful. The CarPlay trigger obviously kicks off a shortcut whenever you connect to your in-car system, but there are a whole bunch of others, letting you automate tasks to run when you connect to your home Wi-Fi network, when you connect to your charger, or even when you receive emails or messages from certain people, with specific keywords.
This music app trick works even better if your car has Wireless CarPlay, since you won’t even have to pull your iPhone out of your pocket. It also works over Bluetooth too — just use the Bluetooth trigger in your automation and choose your car as the Bluetooth device.
You can also use the same approach to autoplay music when you pop in your AirPods or other favourite Bluetooth headphones. You can even have different mixes for different headphones, such as a calling up a workout playlist for your AirPods Pro or a chill mix for your AirPods Max.
Call up Apple Music Playlists for Any Mood
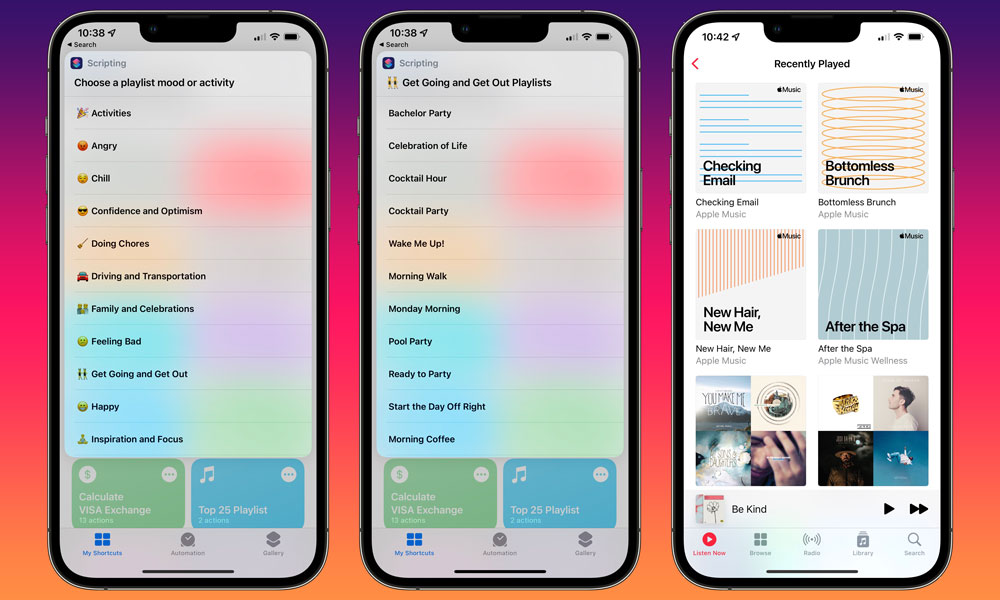
This month, Apple also announced the addition of over 250 new mood and activity playlists for Apple Music. These are now live and cover some of the most eclectic situations we can think of.
Although these are primarily intended to be called up via Siri, using phrases like Play music for a bottomless brunch, it’s also possible to access them directly through the Music app on your iPhone, iPad, or Mac, and the enthusiastic folks over at MacStories have not only compiled a full list, but they’ve also created a Siri Shortcut that groups them all by category, so you can browse through them to see what’s available.
After all, you don’t always know exactly what to ask Siri for, or sometimes even what you’re in the mood for, so this is a great way to get a bit of inspiration.
Use NFC Tags to Say Goodnight
The Shortcuts app has so many tricks up its sleeve that we could probably write about all the different scenarios for days, but here’s another handy one, thanks to the ability of your iPhone to read NFC tags — and trigger shortcuts from them.
You can pick up a pack of NFC stickers for only a few bucks, which can then be placed strategically around your home or in your car. Each tag has a unique ID that can be paired with your iPhone, and then used to trigger a shortcut.
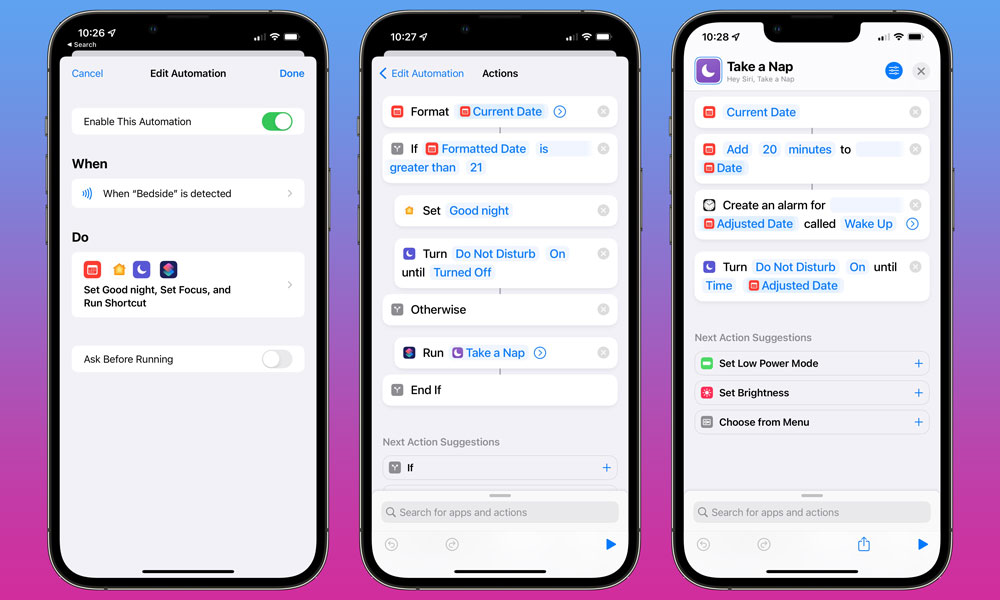
Our favourite trick here is to stick one of these on our bedside table. Then, when going to bed at night, we can simply tap our iPhone against the NFC sticker to launch a shortcut that turns off all the lights, adjusts the thermostat, sets up the appropriate morning alarms, and plays a nice relaxing sleep mix.
While all this can also be done using Siri, the advantage of the NFC method is that it doesn’t disturb anybody else in the home — particularly the person next to you who may already be sound asleep.
For the bonus round, you can even use time-based conditionals in the shortcut for different behaviours based on the time of day. In our case, if we tap the NFC tag during the daytime, such as at two o’clock on a Sunday afternoon, it sets up for a 20-minute “power nap” mode instead, turning off only the bedroom lights, and setting Do Not Disturb and an alarm for the designated time.
Drag and Drop Emails and Notes to Create Linked Reminders
One of the lesser-known new iPhone tricks in iOS 15 is the ability to drag and drop items between multiple apps. We’ve already shown you how to do this with photos, but it works in many more places, and one of our favourites is the productivity-enhancing boost of linking up emails and notes into the Reminders app.
Apple added this form of “deep-linking” in the Reminders app several years ago, but until now, it’s only been available by opening an item like an email, and then calling up Siri and telling it to “Remember this.” This was a somewhat awkward way to do things, especially if you were in a quiet place and didn’t want to use your voice, and to make matters worse, it hasn’t always worked.
Two years ago, Apple partially addressed this in iPadOS 13, allowing you to drag and drop things like emails and notes directly into the Reminders app, where a new reminder would be created with an icon that linked back to the original item. It was actually even more useful there, since you could set up Reminders and Notes or Mail side-by-side to make things even quicker.
With iOS 15, however, this now works on the iPhone too, and even though it’s a bit more cumbersome, in our opinion it’s still far better than talking to Siri. Since you can’t set up multiple windows on an iPhone, the procedure requires a bit more in the way of finger gymnastics:
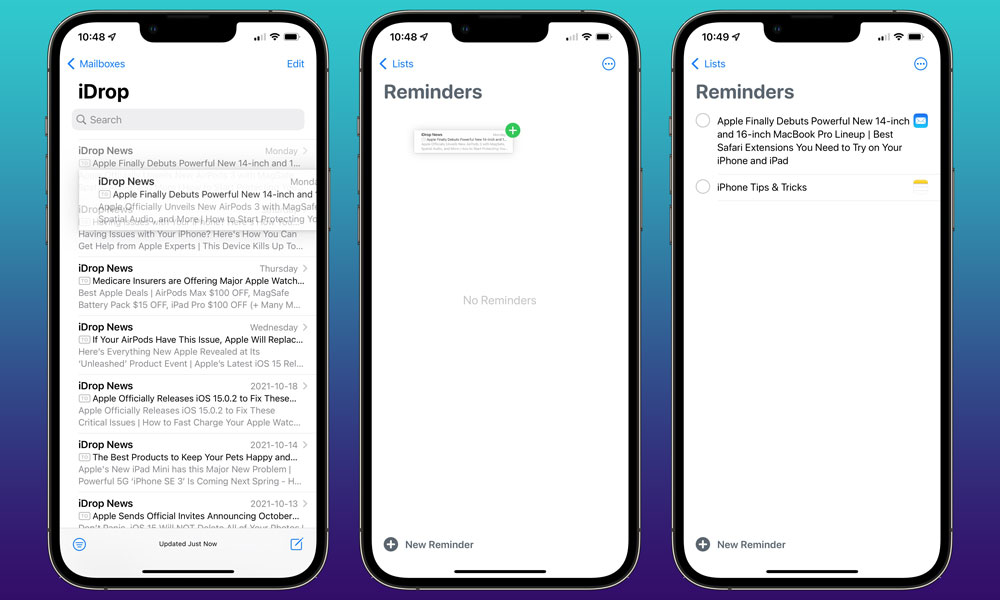
- Open Mail.
- Tap and hold and start dragging a message you want to create a reminder for.
- Once you start dragging, keep your finger on the message to hold it in place.
- Using another finger, swipe up from the bottom of the screen to return to the Home screen. Keep holding your original finger on the message.
- With the second finger, tap the Reminders icon to open the Reminders app.
- Move the first finger, which should still be holding the selected message, to an empty space in a Reminders list and let go.
- A new reminder will be created with the subject of the email. When you tap away from it to stop editing, you’ll see a blue Mail icon to the right. Tapping this will open the original message directly in the Mail app.
You can do the same thing with notes. Just follow the same steps above, starting from the Notes app instead of the Mail app. The title of the note will become the reminder, and a yellow Notes icon will link you back to the original note.
This also works in some third-party apps too. For example, the popular Things task management app will take dragged-and-dropped emails, adding a nice link back to the original email, complete with an envelope icon and the subject line. You can also drop notes into Things, although this only shared the text of the note, as Apple sadly doesn’t let third-party developers link directly into the Notes app.
Keep Track of What’s Important with Quick Notes on Your iPad and Mac
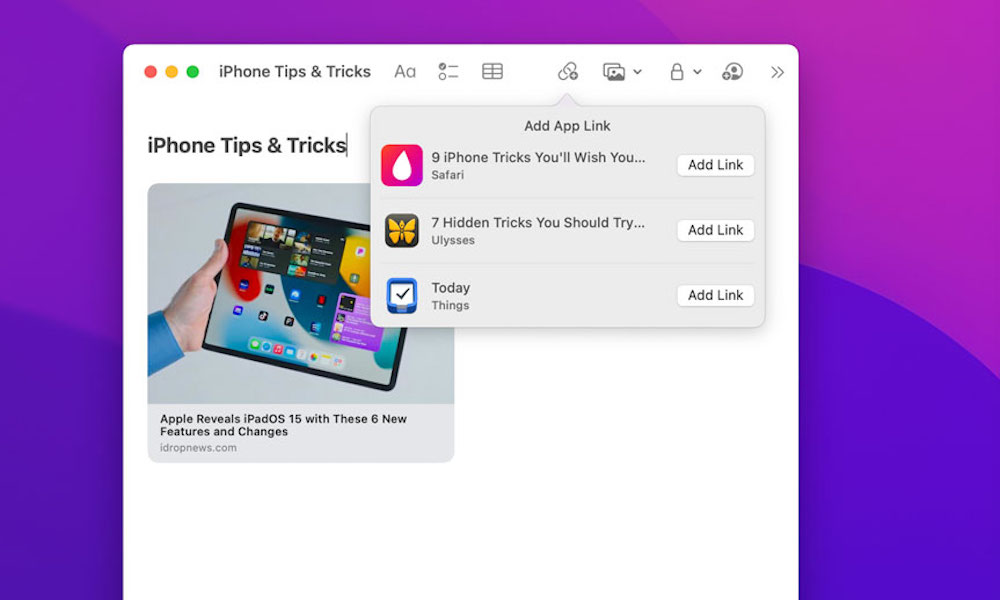
One of the unsung new productivity features in iPadOS 15 is Quick Notes. Not only does this let you jot down notes way more quickly than before (hence the name), but it’s also designed to let you link right into what’s important in your favourite apps.
For instance, if you call up a Quick Note while browsing in Safari, you’ll be able to quickly add a link to whatever web page you’re currently viewing. Or if you’re reading an email and want to remember it for later, simply pull up Quick Notes from the Mail app and you’ll be ready to drop a link into that message.
- You can pull up a Quick Note by swiping up from the bottom-right corner on your iPad or Mac.
- You can also use the keyboard shortcut Fn/Globe-Q, assuming your iPad keyboard has the appropriate modifier key available.
Following the release of iPadOS 15 and macOS 12 Monterey, all the usual popular third-party developers are also baking in Quick Notes support, letting you link right back to a task list in Things, a writing sheet in Ulysses, or an email message in Spark.
While the iPhone sadly doesn’t offer the ability to create Quick Notes, they will be synced via iCloud, so you’ll be able to see them and edit them on your iPhone. The drag-and-drop trick we mentioned earlier also works on the iPhone for adding links to notes, although it’s not nearly as quick as simply tapping the icon on your iPad or Mac to see a list of available links.
Enable Lossless Audio and Dolby Atmos on Your HomePods
This week’s release of iOS 15.1 was accompanied by a HomePod 15.1 software update that brings Apple’s new higher-fidelity audio formats to its smart speaker family.
In fact, the HomePod 15.1 update surprised us with the addition of Spatial Audio with Dolby Atmos support for the now-discontinued full-sized HomePod. It’s a nice touch that shows what the original HomePod is still capable of, and provides some extra hope that Apple will continue this trend for those who invested in the more expensive speaker.
The entire HomePod family also gains support for Lossless audio, and while we’re not convinced that this will matter to most folks, especially on the more sonically challenged HomePod mini, we can’t argue with the idea of getting the best audio quality possible.
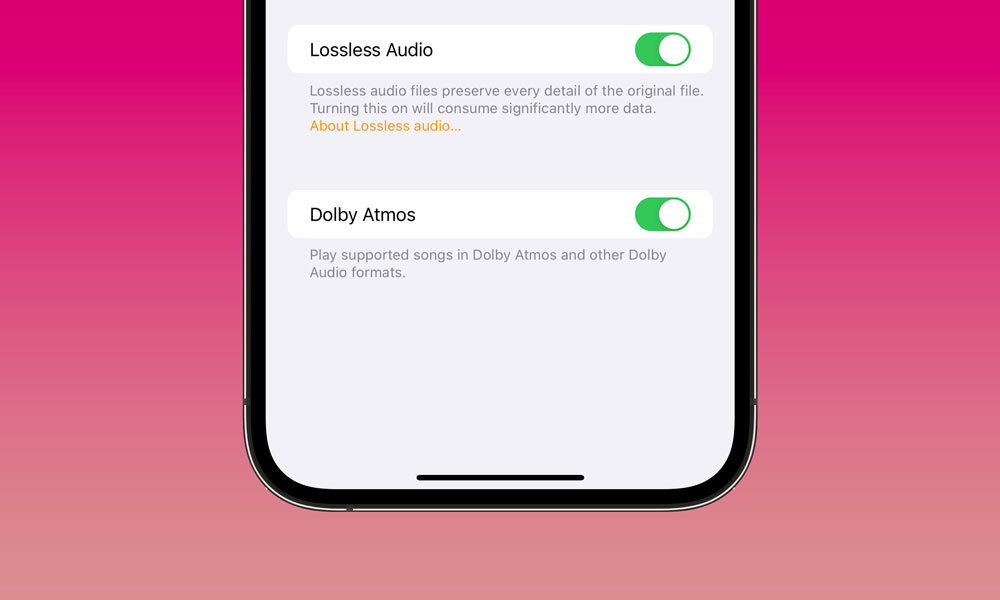
Note that these features aren’t necessarily enabled automatically — we’ve heard mixed reports on this — and the process for checking your settings is a bit inscrutable, as it requires a trip into a corner of the Home app that you probably don’t visit very often. Here’s how to check if Lossless and Dolby Atmos are enabled for your HomePods:
- Open the Home app on your iPhone or iPad.
- Tap the house icon in the top-right corner.
- Near the bottom of the menu that appears, tap Home Settings.
- Under People, tap your name.
- Under Media, tap Apple Music.
- Ensure that Lossless Audio and Dolby Atmos are both switched on.
As the above steps imply, each user may also need to check this for themselves, as Apple has made this a user-specific setting, for whatever reason; as with things like Listening History your HomePods will use voice recognition to associate each user with their personal Apple Music account.