7 Hidden Mac Tips and Tricks You Need to Try
 Credit: Norwood Themes / Unsplash
There comes a time when every Mac user needs to ask themselves this question: are you really using your Mac to its full potential?
Chances are you probably aren't, but don't worry, that's not your fault. There are so many cool things your Mac can do that it's hard to keep up with all the awesome features you can take advantage of.
That's without even trying some of the hidden features that Apple doesn't tell you about. There are many tricks you can try if you want to take your Mac knowledge to the next level, but if you don't know where to begin, we've gathered a few hidden tips to get you started.
Whether this is your first time using a Mac or you're already a connoisseur, you'll likely find some useful Mac features on this list to make your life much easier and help you boost your daily productivity.
Connect Your Mac and other Apple Devices With Handoff
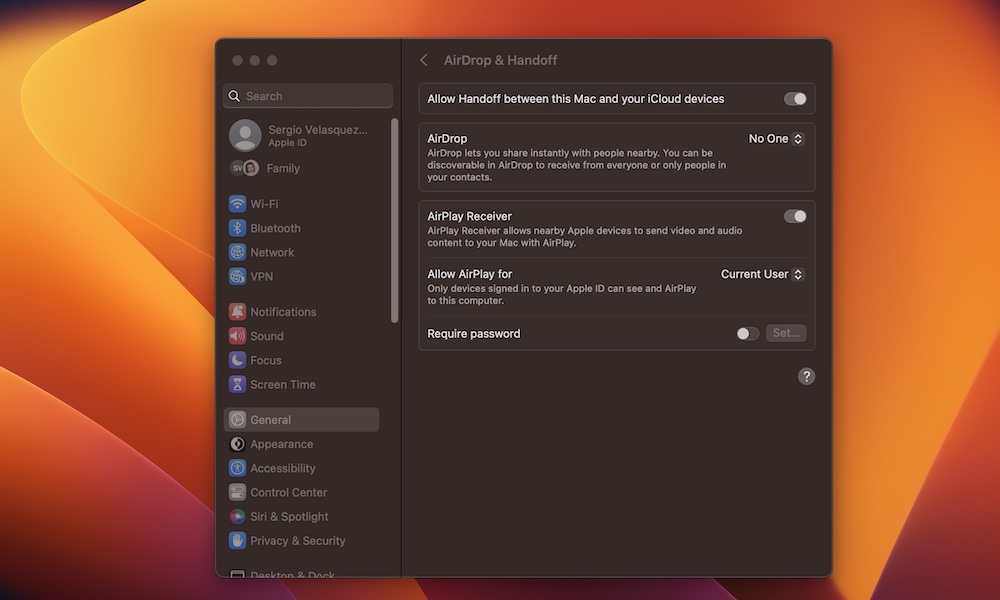
Handoff is a really handy feature that helps you connect your iPhone, Mac, and other Apple devices in a pretty unique way. For instance, you can start using an app on your Mac and quickly switch to your iPhone or iPad and pick up where you left off without missing a beat.
You can also copy a piece of text or even a photo to the clipboard on one device and instantly paste it into just about any app on another without having to resort to using AirDrop or sending it via text or email.
To start using Handoff, you first need to enable it on your iPhone, iPad, and Mac. It should be on by default as long as you're signed into the same iCloud account on all your devices, but here's how to make sure:
How to Enable Handoff on iPhone and iPad
- Open the Settings app.
- Select General.
- Select AirPlay & Handoff.
- Toggle Handoff on.
How to Enable Handoff on Mac
- Click on the Apple menu (?) in the top left corner of your screen.
- Click System Settings on macOS Ventura or System Preferences if you're using macOS Monterey or older.
- Click General.
- If you're using macOS Ventura, click Airplay & Handoff.
- Toggle on Allow Handoff between this Mac and your iCloud devices.
Once Handoff is enabled, you can quickly switch between devices simply by opening an app on your Mac or iPhone and then going to the other device and looking for the icon in the macOS Dock or iOS/iPadOS app switcher.
For instance, if you want to open an iPhone app on your Mac, go to your Mac's Dock, and you should see the app on the right side, near the trash can. You'll know it's an iPhone app because there'll be a small iPhone icon in the top right corner of the app. This even works for Apple Watch apps, which will show a small watch icon in the corner.
Take Screenshots the Right Way
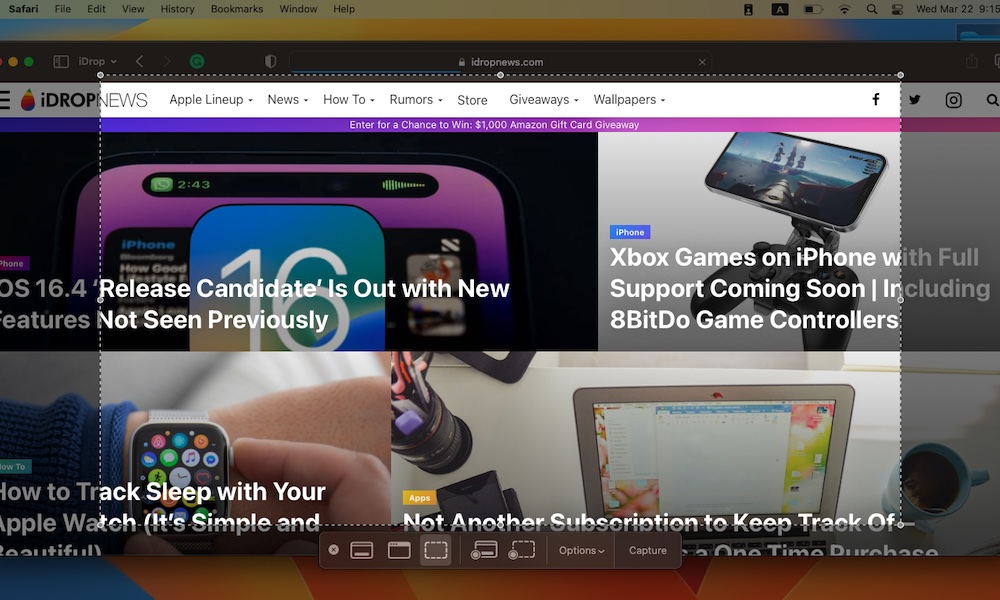
Your Mac can take screenshots of your entire screen in an instant, but if you want to take your screenshotting game to the next level, you'll need to learn some keyboard shortcuts that will help you out.
For starters, pressing Command + Shift + 3 will take a screenshot of the complete screen. If you're using more than one monitor, your Mac will take a separate screenshot of each monitor and save each one in an individual file.
If you press Command + Shift + 4, your cursor will change, and you'll be able to select the area you want to screenshot. Just drag your cursor around the area, and once you release it, your Mac will take the screenshot. If you press the Spacebar while you're in this mode, the cursor will change to a camera icon to capture an entire window. Hover over the window you want to take a screenshot of click to capture it.
Lastly, pressing Command + Shift + 5 will bring up the full set of screen capture options, shown in a menu bar that pops up near the bottom of your screen. This will default to the last mode you used, but you can click the icons to switch between capturing the entire screen or just an individual window or a selected portion of your screen.
You can also use this menu to make a screen recording, choose where to save your screenshots, and even set a timer before an image is captured so you have time to set things up the way you want them to look.
Find the Perfect Emoji in Any App You're Using
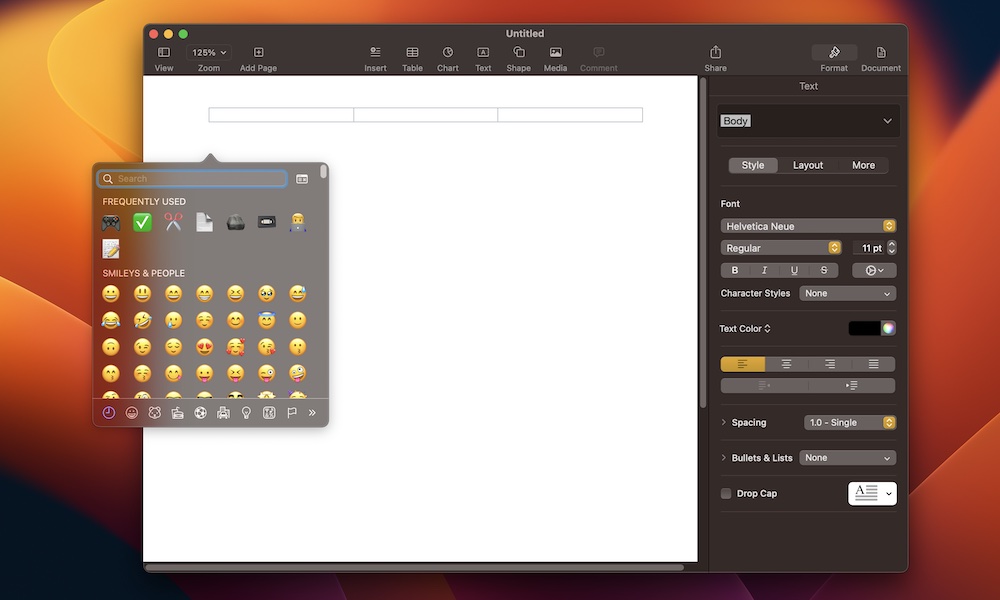
How many times have you wanted to send a message with a cute emoji, but it's so hard to find emojis that you decided to send a simple smiley face instead?
The good news is you don't have to struggle with that problem anymore. Your Mac has a quick option where you can pull up your favorite emotes in a flash.
To quickly see all the emojis available, simply press Control + Command + Spacebar. You can also click Edit at the top of your screen and then select Emoji & Symbols. You'll get a new window with a bunch of emojis to choose from and even a search bar to help you find the perfect one. Once you've got the emoji you want, just click on it and it will be inserted at the current cursor position.
Preview Any File Before Opening It
Thanks to a feature called Quick Look, you can peek inside any file from the Mac Finder without having to actually it in a corresponding app. This comes in handy when trying to track down a specific file or photo from a large folder or list of search results.
The fastest way to use Quick Look is by selecting the file you want and then pressing the spacebar. Alternatively, you can also control-click (right-click) a file and select Quick Look.
In both cases, your Mac will open a small window with a preview of the file. If that's the file you want to open, simply click Open With in the top right corner of the window. Otherwise, press the spacebar again to close the preview window and carry on.
However, as an added bonus, you can leave the Quick Look preview window open as you continue to navigate through your file list, either by clicking on other files or using the up and down arrow keys. Quick Look will update to show you each selected file as you move through the list, making it really easy to find what you're looking for.
Unlock Your Mac With Your Apple Watch
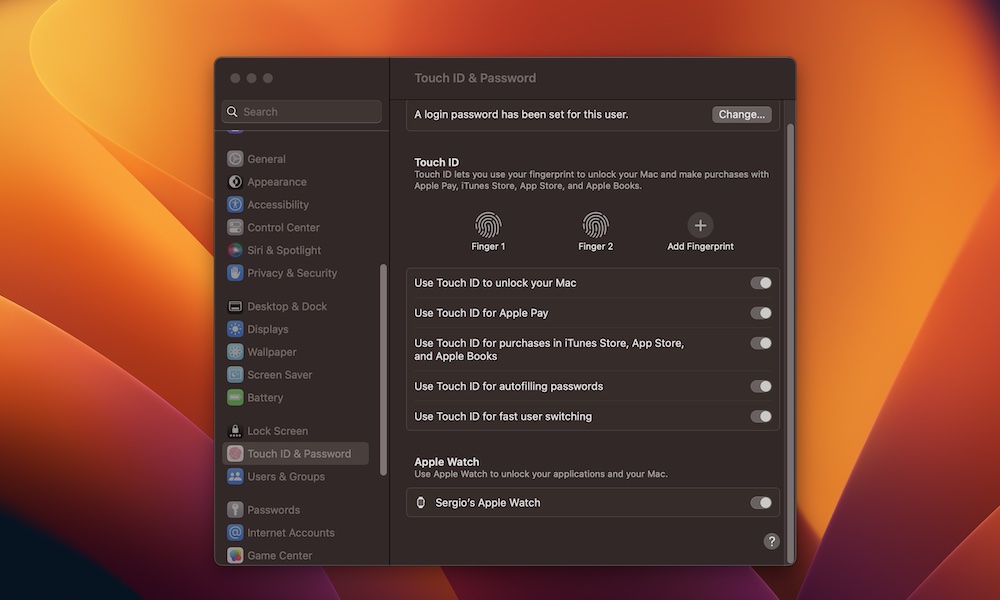
If you have an Apple Watch, you already know it's a great iPhone companion, but it also has at least one cool trick you can use with your Mac.
Your Apple Watch can help you unlock your Mac just by wearing it. Here's how to enable it:
- Click on the Apple menu (?) in the top left corner of your screen.
- Click System Settings on macOS Ventura or System Preferences if you're using macOS Monterey or older.
- On macOS Ventura, scroll down on the left sidebar and click on Touch ID & Password (or Login & Password if your Mac doesn't have a Touch ID sensor).
- If you're running macOS Monterey or older, select Security & Privacy.
- Enable the setting under Use Apple Watch to unlock apps and your Mac.
- Enter your Mac's password to confirm.
Now you can give it a try by letting your Mac screensaver kick in or putting it to sleep and then waking it up again. As long as you're wearing your watch and it's within a couple of feet of your Mac, it should just automatically bypass the normal unlock password and take you right back in.
You can also use your Apple Watch to unlock certain apps on your Mac and confirm password requests for things like installing software. However, in this case, you'll need to double-click the side button on your Apple Watch for confirmation. This is an extra precaution to make sure you actually approve of whatever your Mac is asking you to do.
Keep in mind that your Apple Watch needs to have a passcode for this to work, and of course, you need to be wearing your Apple Watch and have it unlocked. Bluetooth and Wi-Fi must also be enabled on your Mac. Both devices must be signed into the same iCloud account, and two-factor authentication has to be enabled on your Apple ID.
Use Spotlight to Do Math
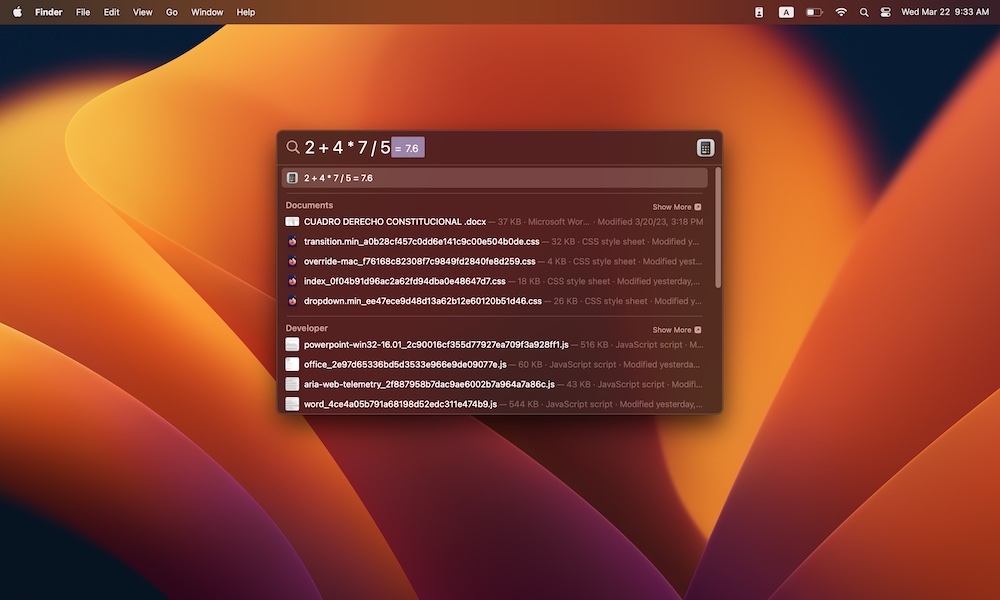
The Spotlight Search on Mac is a powerful tool to keep track of the apps and files that you've saved on your Mac. However, that's not the only thing it does; you can also use Spotlight to do some quick math.
First, launch Spotlight Search either by clicking the magnifying glass in the top right corner of your Mac or pressing Command + Spacebar. Then, type in a calculation like "2 + 4 * 7 / 5." After you finish typing, Spotlight will highlight the answer right after your calculation.
You can even use advanced operators like parentheses to group calculations, the carat for exponents (e.g., "2^3"), and abbreviations for mathematical functions like sqrt, sin, cos, tan, log (e.g., "sqrt(25)") and even pi as a placeholder for the well-known constant (e.g., "3*pi").
As a bonus, you can also use Spotlight Search to convert currency and even some pretty obscure units of measurement. For instance, you can write things like "5 USD to CAD", "12 inches in cm", "32C in K", or "32 BTUs in ergs", and Spotlight will immediately show you the appropriate answers.
Use Your Mac's Corners as Shortcuts
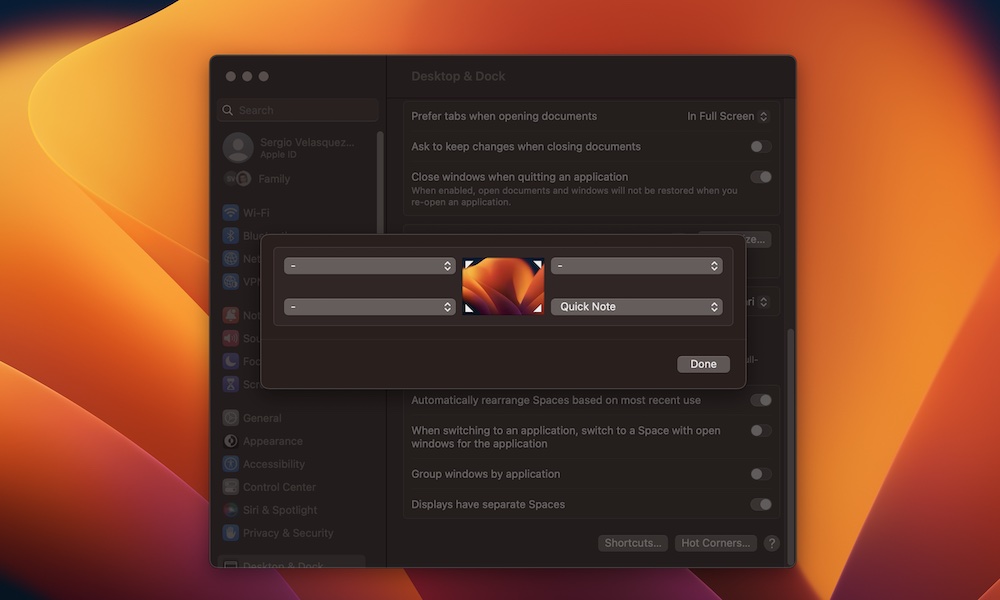
You can add shortcuts to any or all of the four corners of your screen to let you quickly call things up with a flick or your mouse. For instance, you've probably already seen how you can pull out a Quick Note just by placing your mouse in the bottom right corner of your screen.
This feature is called Hot Corners, and you can use it for a variety of different functions, like launching Notes or locking your Mac. Her'es how to set it up:
- Click on the Apple menu (?) in the top left corner of your screen.
Click System Settings on macOS Ventura or System Preferences if you're using macOS Monterey or older. - On macOS Ventura, click on Desktop & Dock from the sidebar.
- On macOS Monterey or earlier, click on Desktop & Screen Saver and then click Screen Saver.
- Click Hot Corners.
- Choose the corner you want and then select any action you want to use.
- When you're finished, click Done in the bottom right corner of the window.
Once you've set everything up, just drag your mouse to the appropriate corner to trigger whatever action you've selected.